Chapter 4: Engineering Your First RAG Project — From Scripts to Modular and Maintainable Systems
Poorly structured projects are hard to read, expensive to maintain, and prone to bugs. An inconsistent style also slows down code reviews, increases merge conflicts, and makes automated testing or CI/CD pipelines brittle.
This tutorial starts with a tiny Python script and evolves it into a well-structured project. We will cover Git-based version control, style checks, unit tests, CI/CD, documentation, and packaging/publishing workflows.
1. Code management: Setting up a Git project from scratch
1.1 What is Git
Gitis a distributed version control system that tracks file changes and is ideal for collaborative software development. Multiple developers can work in parallel while preserving the entire history. More details
1.2 Why use Git
- Track every change and roll back safely
- Collaborate efficiently with teammates
- Manage branches to isolate work and reduce conflicts
- Host code on GitHub/GitLab for backups and sharing
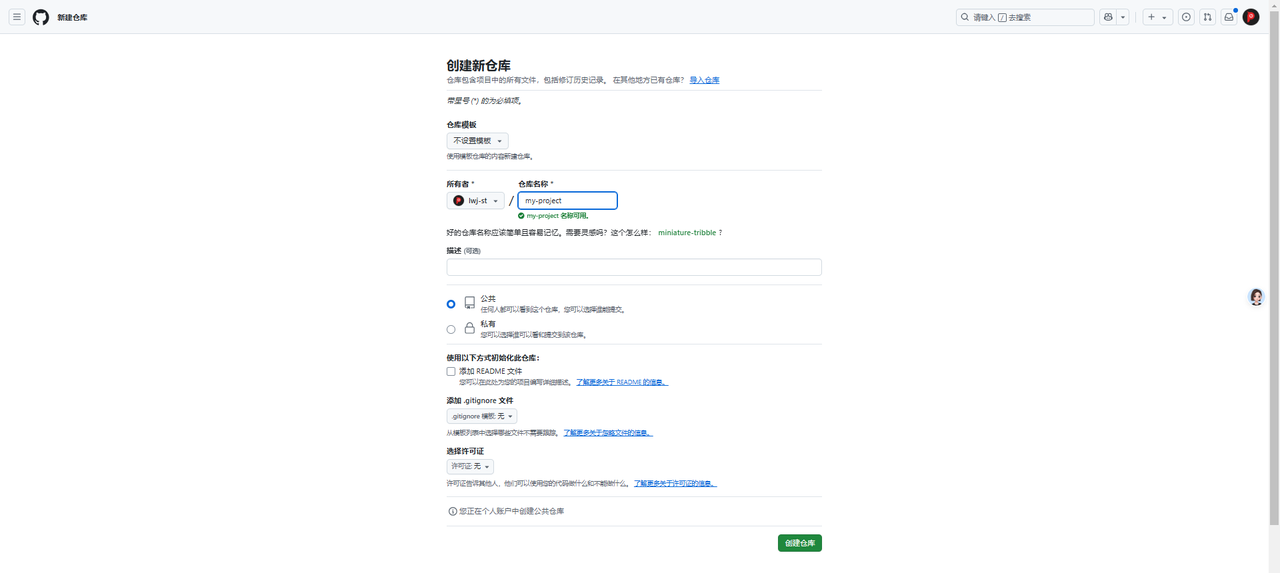
1.3 Create a GitHub repository
- Sign in to your GitHub account (or create one first).
- Create a repository such as my-project.
- Provide a repository name (description is optional). Pick Public for open source or Private for internal code, then click Create repository.
1.4 Initialize the repo locally and push to GitHub
- Create the repository on GitHub.
- Generate a personal access token for pushing code (guide).
- Initialize the repo locally and push the first commit:
>>> mkdir my-project && cd my-project
>>> echo "# test" >> README.md
>>> git init

# Configure Git identity the first time you use it
>>> git config --global user.name "your-username"
>>> git config --global user.email "your-email@example.com"

>>> git add README.md
>>> git commit -m "test"
>>> git branch -M main
>>> git remote add origin <your-repo-url>
>>> git push -u origin main
- When prompted, supply your GitHub username and personal access token so the push can reach the remote repository.
>>> git push -u origin main
Username for 'https://github.com': lwj-st
Password for 'https://lwj-st@github.com':
Enumerating objects: 3, done.
Counting objects: 100% (3/3), done.
Writing objects: 100% (3/3), 223 bytes | 223.00 KiB/s, done.
Total 3 (delta 0), reused 0 (delta 0), pack-reused 0
To https://github.com/lwj-st/my-project.git
 * [new branch]      main -> main
Branch 'main' set up to track remote branch 'main' from 'origin'.
1.5 Add foundational project files
README.mddescribes the project. Example:
# my-project

## Overview
This is a sample Python project that supports automated tests, Docker deployment, and the PEP 8 style guide.

## Installation
pip install my-project
.gitignoreexcludes generated artifacts such as bytecode, logs, and editor files. Rules reference. Example:
requirements.txtlists Python dependencies. Example:
Dockerfile: image build instructions so you can publish a container.setup.py: packaging script powered by setuptools.
1.6 Add the main project files
For the sample project we reuse the code from Chapter 2: Build a Minimal RAG in 10 Minutes and add the following modules:
my_project/retriever.py
from lazyllm import Retriever, Document


def create_retriever(path: str, query: str):
    """
    Create and execute a retrieval run.

    Args:
        path (str): Absolute path to the document directory.
        query (str): User query.

    Returns:
        list: Retriever results.
    """
    doc = Document(path)
    retriever = Retriever(doc, group_name="CoarseChunk", similarity="bm25_chinese", topk=3)
    return retriever(query)
my_project/__init__.py
2. Version control and branching strategy
A clean branching model keeps collaboration smooth and releases stable.
2.1 Common branch names
- Main branch (
main): always releasable. - Development branch (
dev): day-to-day work. - Feature branches (
feature/*): build a feature, then merge back intodev. - Hotfix branches (
hotfix/*): emergency fixes for production issues.
2.2 Git branch management examples
# Create and switch to the development branch
>>> git checkout -b dev

# Start a feature branch from dev
>>> git checkout -b feature/new-feature

...make changes...

>>> git add .
>>> git commit -m "Add new feature"
>>> git push origin feature/new-feature

# Merge the feature back into dev
>>> git checkout dev
>>> git merge feature/new-feature
>>> git push origin dev
2.3 Open a pull request on GitHub
- After pushing your work, go to the repository page and click Pull Requests → New Pull Request.
- For pull requests inside the same repository, choose the base (target branch) and compare (your branch).
- For forked repositories, you will also pick the base repository and head repository in addition to the branches.
- Provide a clear description and click Create Pull Request.
2.4 Resolve conflicts
When multiple developers change the same code, Git may report a conflict.
-
Conflicts on the same branch
-
If you try to push stale code, Git shows a warning like this:
To https://github.com/lwj-st/my-project.git
 ! [rejected]        dev -> dev (fetch first)
error: failed to push some refs to 'https://github.com/lwj-st/my-project.git'
hint: Updates were rejected because the remote contains work that you do
hint: not have locally. This is usually caused by another repository pushing
hint: to the same ref. You may want to first integrate the remote changes
hint: (e.g., 'git pull ...') before pushing again.
hint: See the 'Note about fast-forwards' in 'git push --help' for details.
- Run
git pullto merge the remote branch locally.
CONFLICT (content): Merge conflict in requirements.txt
Automatic merge failed; fix conflicts and then commit the result.
- Use
git statusto discover which files contain conflicts.
>>> git status
On branch dev
Your branch and 'origin/dev' have diverged,
and have 1 and 1 different commits each, respectively.
  (use "git pull" to merge the remote branch into yours)

You have unmerged paths.
  (fix conflicts and run "git commit")
  (use "git merge --abort" to abort the merge)

Unmerged paths:
  (use "git add <file>..." to mark resolution)
        both modified:   requirements.txt

no changes added to commit (use "git add" and/or "git commit -a")
- Edit the files, keep the correct code, then add and commit the result:
-
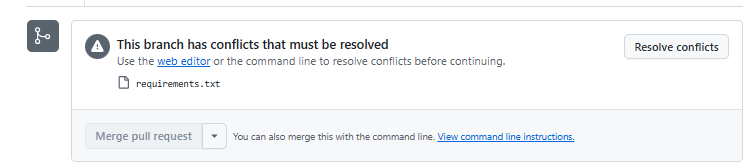
Resolving PR conflicts
-
When a PR has conflicts, GitHub will display the message This branch has conflicts that must be resolved, as shown below:
-
You can resolve the conflict directly on the webpage by clicking Resolve conflicts.
-
Edit the conflicted file, keep the content you want, and then click Mark as resolved.
-
Git will mark conflicting sections in the file using the following format:
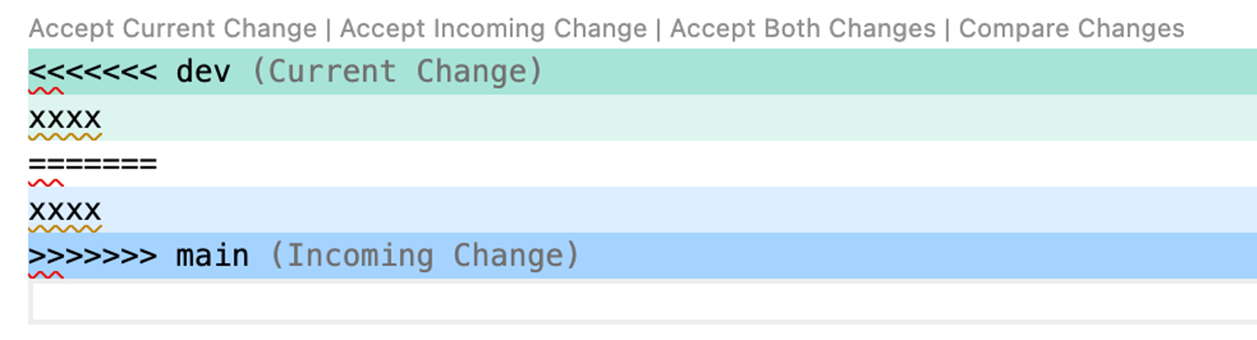
<<<<<<< devshows the incoming changes fromdev.=======separates both versions.>>>>>>> mainshows the current branch (main).
3. Code style and automated checks
To ensure consistent code quality across the project, it is important to follow a unified coding standard.
3.1 Popular tools
-
black– Automatic code formatter -
Install
black:
- Format the entire repo with
black ..
>>> black .
reformatted /root/my_project/__init__.py
reformatted /root/my_project/retriever.py

All done! ✨ 🍰 ✨
2 files reformatted.
- Highlights
- Strict formatting that reduces style debates.
- 88-character lines by default (configurable).
- Automatic quote normalization (prefers double quotes).
-
Optimizes indentation for control flow such as
if/elseand list literals. -
flake8– style linter -
Install
flake8:
- Run
flake8 .to scan the repo. Any output points to files that need attention.
- Highlights
- Style checking based on PEP 8.
- Syntax validation that catches undefined variables or syntax errors.
- Complexity analysis via the McCabe plugin.
-
Plugin ecosystem for extra rules such as type checks.
-
pre-commit– run checks before every commit -
Install
pre-commit:
- Initialize
pre-commit:
- Configure
.pre-commit-config.yaml:
repos:
  - repo: https://github.com/psf/black
    rev: 23.1.0
    hooks:
      - id: black

  - repo: https://github.com/pycqa/flake8
    rev: 6.0.0
    hooks:
      - id: flake8
4. Unit testing and code quality assurance
4.1 Why write unit tests
-
Ensure correctness after changes and improve overall code quality
-
Enhance maintainability and reduce long-term maintenance costs
-
Catch bugs early and prevent unintended changes from breaking existing functionality, improving development efficiency
-
Serve as documentation and help the team understand the code
4.2 Write tests with pytest
pytestis the most popular testing framework in the Python ecosystem. It automates assertions and reduces manual testing.
-
Naming rules
-
Files must start with
test_or end with_test.py. - Classes start with
Testand should not define__init__. - Functions/methods start with
test_. -
You can customize these rules via
pytest.ini. -
Install
pytest:
- Create
tests/test_retriever.py:
import pytest
from my_project import create_retriever

TEST_PATH = "./data_kb"


def test_retriever_contains_keyword():
    test_query = "Tell me about the 2008 Beijing Olympic Games"
    expected_keyword = "Olympic Games"

    results = create_retriever(TEST_PATH, test_query)
    top_content = results[0].get_content() if results else ""

    assert expected_keyword in top_content, f"Keyword '{expected_keyword}' not found in retrieved content"


def test_retriever_empty_query():
    results = create_retriever(TEST_PATH, "")
    assert isinstance(results, list), "The retriever should return a list"
- Running the tests (make sure the test data ./data_kb is prepared in advance)
>>> export PYTHONPATH=${PWD}:$PYTHONPATH
>>> pytest --disable-warnings tests/test_retriever.py
==================================== test session starts ====================================
platform linux -- Python 3.10.9, pytest-8.3.3, pluggy-1.5.0
rootdir: /root
plugins: anyio-4.4.0, hydra-core-1.3.2
collected 2 items

tests/test_retriever.py ..                                                                   [100%]

===================================== 2 passed in 0.01s =====================================
--disable-warningshides deprecation noise and only shows real errors.
4.3 Common pytest markers (extended)
-
Pytest provides a
markersmechanism that allows you to categorize tests, control test execution, parameterize test cases, and more. Below are some commonly used pytest markers and their purposes. -
Example:
tests/test_server.py
# content of test_server.py
import pytest

@pytest.mark.webtest
def test_send_http():
    pass  # perform some webtest test for your app

@pytest.mark.device(serial="123")
def test_something_quick():
    pass

@pytest.mark.device(serial="abc")
def test_another():
    pass

class TestClass:
    def test_method(self):
        pass
- Run only the tests marked with
webtest:
>>>  pytest -v -m webtest
==================================== test session starts ====================================
platform linux -- Python 3.10.9, pytest-8.3.3, pluggy-1.5.0 -- /opt/miniconda3/envs/lazyllm/bin/python
cachedir: .pytest_cache
rootdir: /root/my-project
plugins: anyio-4.4.0, hydra-core-1.3.2
collected 4 items / 3 deselected / 1 selected

tests/test_server.py::test_send_http PASSED                                           [100%]
======================== 1 passed, 3 deselected, 3 warnings in 0.01s ========================
- You can also filter on marker arguments, e.g. run only
device(serial="123"):
>>>  pytest -v -m "device(serial='123')"
==================================== test session starts ====================================
platform linux -- Python 3.10.9, pytest-8.3.3, pluggy-1.5.0 -- /opt/miniconda3/envs/lazyllm/bin/python
cachedir: .pytest_cache
rootdir: /root/my-project
plugins: anyio-4.4.0, hydra-core-1.3.2
collected 4 items / 3 deselected / 1 selected

tests/test_server.py::test_something_quick PASSED                                     [100%]
======================== 1 passed, 3 deselected, 3 warnings in 0.03s ========================
More details: markers
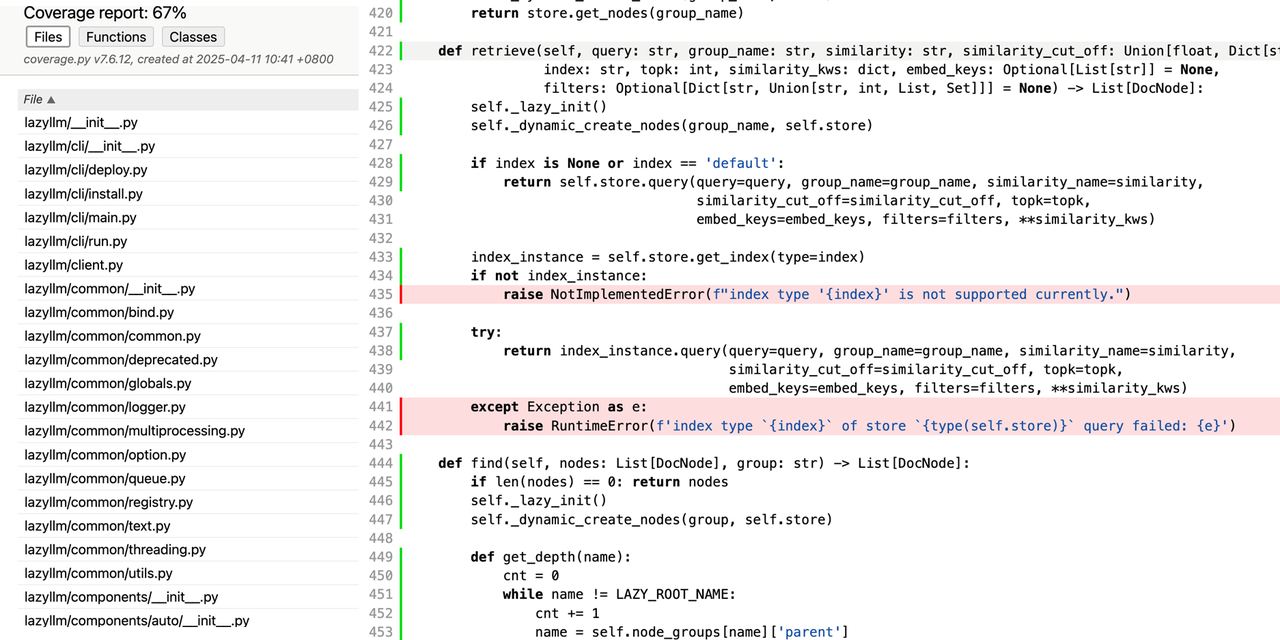
4.4 Test coverage
- CI usually enforces coverage thresholds. Combine
pytestwithpytest-covto generate HTML reports. - Run the tests with coverage enabled:
- Reports are stored under htmlcov/.
pytest --cov=my-projectscopes coverage to themy-projectpackage.--cov-appendkeeps results when running multiple times.--cov-report=htmlcreates a visual report.- Reference: pytest-cov
5. Continuous Integration (CI)
5.1 Why use CI
-
Traditional development and testing often run into issues such as:
-
Manual testing can be incomplete or simply forgotten.
-
Team members may have different local environments, causing the classic “it works on my machine” problem.
-
If tests are run manually only after merging, bugs may be discovered too late and become more expensive to fix.
-
When there are many code changes, manual testing can easily miss edge cases.
-
Differences in coding style among developers can lead to inconsistent and messy code.
-
Using GitHub Actions CI provides several benefits:
-
Automatically runs tests on every push and pull request, preventing issues from entering the main branch.
-
Developers receive immediate feedback on whether the code passes all tests.
-
Tests run in a standardized GitHub Runner environment, avoiding inconsistencies caused by local setups.
-
Multiple test jobs can run in parallel, speeding up feedback.
-
Tools such as prettier, black, flake8, and eslint can automatically enforce style checks and keep the codebase consistent.
-
GitHub provides free runners, allowing you to use CI at no cost.
5.2 Configure CI
- Add
.github/workflows/test.yml:
name: Run Tests
on: [push, pull_request]
jobs:
  test:
    runs-on: ubuntu-latest
    steps:
      - uses: actions/checkout@v3
      - name: Set up Python
        uses: actions/setup-python@v3
        with:
          python-version: "3.10"
      - name: Install dependencies
        run: pip install -r requirements.txt
      - name: Run tests
        run: |
          export PYTHONPATH=${PWD}:$PYTHONPATH
          pytest
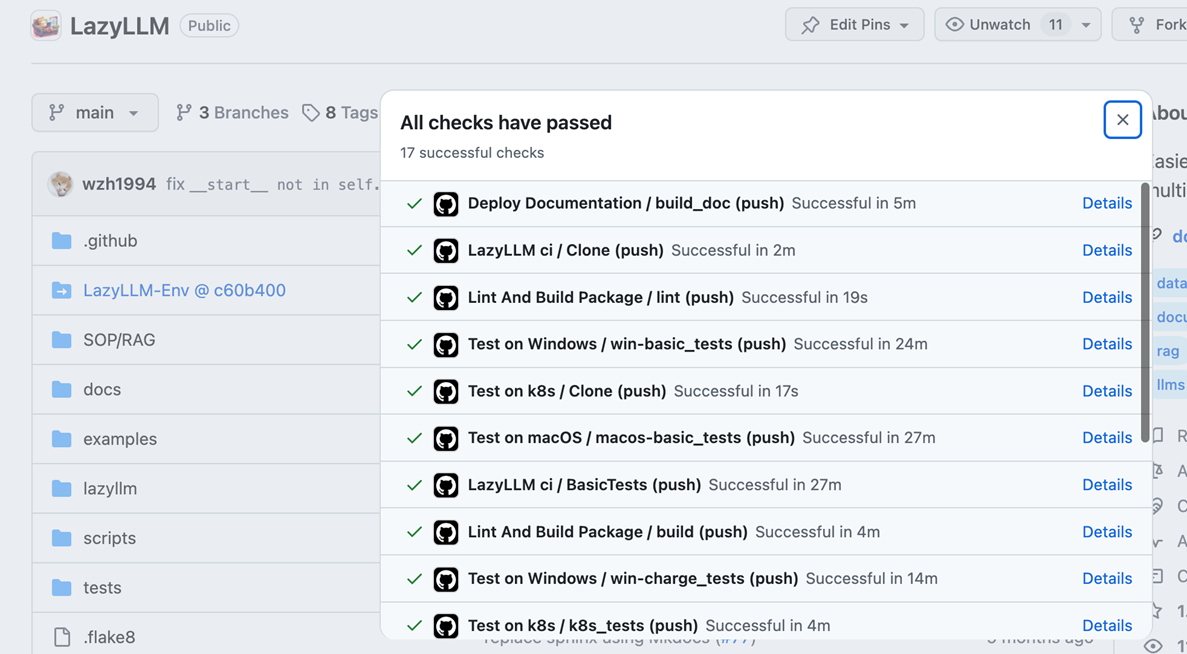
- Every push or pull request now runs the workflow automatically.
6. Documentation with MkDocs
6.1 Why MkDocs
- Documentation pain points:
- Files scattered across Word, Markdown, PDF, or wiki pages.
- No version control, so edits are hard to trace.
- Manual publishing steps.
- MkDocs solves these issues by:
- Using Markdown with a consistent, easy-to-read format.
- Keeping docs in Git alongside the code.
- Integrating with GitHub Actions or Read the Docs for automatic builds.
6.2 Generate docs with MkDocs
- Install the dependency (install guide):
- Initialize MkDocs:
- The scaffold creates
mkdocs.ymlplus adocs/folder that initially contains onlyindex.md(you can change the folder viadocs_dir):
-
Preview the docs locally:
-
Start the dev server with
mkdocs serve- use
-ato change the port, e.g.mkdocs serve -a 0.0.0.0:8008.
- use
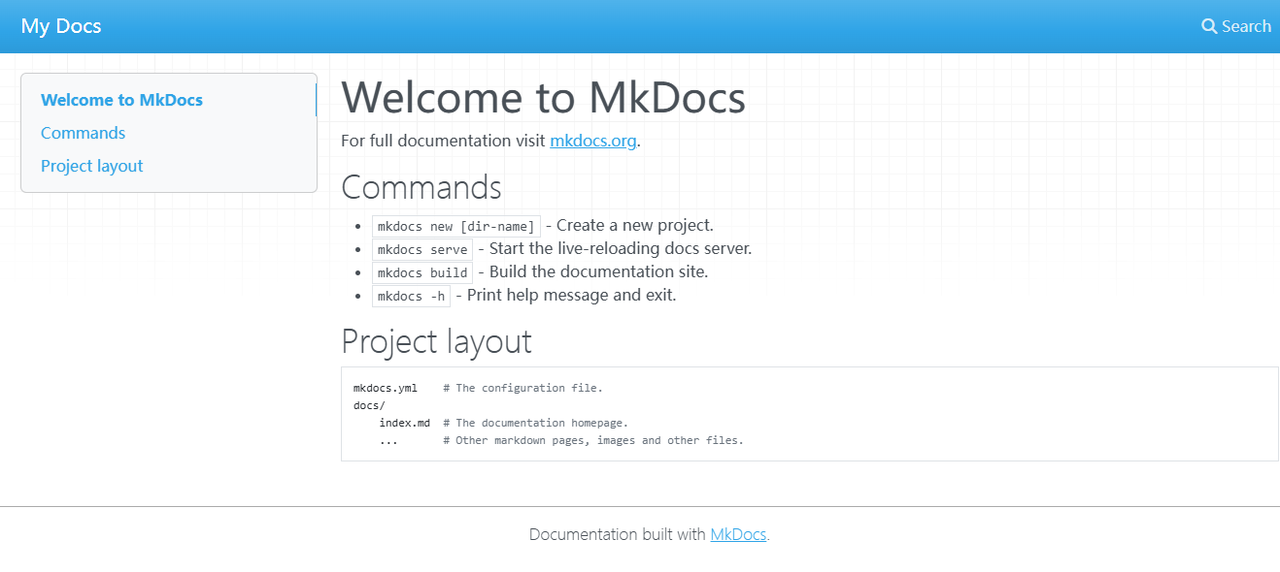
  $ mkdocs serve
  INFO    -  Building documentation...
  INFO    -  Cleaning site directory
  INFO    -  Documentation built in 0.22 seconds
  INFO    -  [15:50:43] Watching paths for changes: 'docs', 'mkdocs.yml'
  INFO    -  [15:50:43] Serving on http://127.0.0.1:8000/
- Open http://127.0.0.1:8000/ to see the default home page.
- Full configuration: https://www.mkdocs.org/
6.3 Host on Read the Docs
- Why choose Read the Docs?
Good documentation is essential for any project. Instead of keeping docs scattered across local files, Markdown documents, or wiki pages, Read the Docs provides an efficient platform for hosting and automatically building online documentation. It is especially well-suited for open-source projects and continuously updated technical documentation.
Key advantages of hosting your docs on Read the Docs:
-
Automatic builds: Whenever you push changes to GitHub, Read the Docs automatically builds and updates the documentation.
-
Version management: Supports multiple documentation versions, allowing users to browse versions such as
latest,stable, or specific releases likev1.0. -
Online search: Built-in search makes it easy for users to find content quickly.
-
Free hosting: Entirely free to use. You do not need to purchase servers or domains. It also provides
HTTPSby default, with no need to configure SSL certificates manually. -
Add
.readthedocs.yaml(config reference):
# .readthedocs.yaml
# Read the Docs configuration file

# Required version field
version: 2

# Configure the build environment
build:
  os: ubuntu-24.04
  tools:
    python: "3.10"  # MkDocs needs Python

# Wire MkDocs to the config file
mkdocs:
  configuration: mkdocs.yml

# Optional: install Python dependencies
#python:
#  install:
#    - requirements: requirements.txt
- Register a Read the Docs account (you can sign in using GitHub).
- Click Import a Project.
- Select the GitHub repo and press ➕.
- Configure the name, default branch, and language.
- Click Next to trigger the first build.
- Read the Docs builds and hosts each version automatically.
- Browse the docs at
https://<your-project>.readthedocs.io/(replace<your-project>with your slug).
7. Artifacts
7.1 Why build artifacts
In Python project development, beyond writing code, we often need to package the project into formats that are publishable, installable, and reproducible. These packaged outputs are called artifacts. Artifacts can include Python packages (wheel, sdist), Docker images, binaries, and executable programs.
The main reasons for creating artifacts are:
-
Easy distribution and release: Without artifacts, users would need to download the source code, install dependencies, and configure the environment themselves. This process is error-prone and inconvenient.
-
Environment consistency: Different environments (development, testing, production) may depend on different versions of libraries, leading to inconsistent behavior. Artifacts help ensure a reproducible environment.
-
Better testing and rollback: With artifacts, it’s easy to select and use a specific version. Without them, every test would require rebuilding the environment, and rolling back to previous versions would be difficult.
7.2 Wheel packages
7.2.1 Why build wheels
A .whl (Wheel) file is a binary distribution format for Python packages, offering a more efficient installation process compared to building from source. It is the most common format for releasing and deploying Python projects.
-
Faster installation: Installing from a wheel is much quicker because it avoids compiling from source. Users can simply run pip install my-project.whl.
-
Industry standard: Modern Python projects typically publish wheel packages and upload them to the official
PyPIrepository, making distribution and usage significantly easier.
7.2.2 Package with setuptools
Define the metadata in setup.py and build the wheel:
from setuptools import setup, find_packages

setup(
    name="my_project",
    version="0.1.0",
    packages=find_packages(),
    install_requires=[
        "lazyllm",
    ],
    author="Your Name",
    author_email="your@email.com",
    description="A simple RAG retriever package",
    long_description=open("README.md").read(),
    long_description_content_type="text/markdown",
    python_requires=">=3.6",
)
Generate the .whl file:
>>> python setup.py bdist_wheel
running bdist_wheel
running build
running build_py
creating build
creating build/lib
creating build/lib/my_project

....

adding 'my_project-0.1.0.dist-info/WHEEL'
adding 'my_project-0.1.0.dist-info/top_level.txt'
adding 'my_project-0.1.0.dist-info/RECORD'
removing build/bdist.linux-x86_64/wheel
>>> ls dist/
my_project-0.1.0-py3-none-any.whl
7.2.3 Create a PyPI account
- Register and sign in at PyPI.
- Open Account settings.
- Under API tokens, click Add API token.
- Configure the token:
- Name: e.g.,
INDEX_PYPI_TOKEN - Scope: prefer Specific project for better security
- Click Create token and copy it (it is shown only once).
7.2.4 Build and upload the wheel
- Add the
.pypircfile locally:
[pypi]
  username = __token__
  password = pypi-xxxxxxxxxxxxxxxxxxxYjNjNS0xMDExNWMwMzhlNDMiXQAABiDpxiNjoqIT3SJDNrQPP-BJl_AhO7pHErgKvOnS4jzNrQ
- Install the upload tool and publish the artifact:
7.2.5 Continuous deployment to PyPI
Automate wheel uploads with GitHub Actions. Trigger on tags so every release publishes itself.
- Open the repo → Settings → Secrets and variables → Actions.
- Click New repository secret.
- Name it
INDEX_PYPI_TOKEN(value = your API token). - Add
.github/workflows/publish-to-pypi.yaml:
name: Publish to PyPI

on:
  push:
    tags:
      - "v*"  # Trigger whenever a tag like v1.0.0 is created

jobs:
  deploy:
    runs-on: ubuntu-latest
    steps:
      - name: Checkout repository
        uses: actions/checkout@v3

      - name: Setup Python
        uses: actions/setup-python@v4
        with:
          python-version: "3.x"

      - name: Install dependencies
        run: |
          python -m pip install --upgrade pip
          pip install build twine

      - name: Build package
        run: python -m build

      - name: Upload to PyPI
        env:
          INDEX_PYPI_TOKEN: ${{ secrets.INDEX_PYPI_TOKEN }}
        run: |
          twine upload --username __token__ --password $INDEX_PYPI_TOKEN dist/*
- Whenever you push a tag such as
v1.0.0, the workflow builds the wheel and uploads it to PyPI.
7.2.6 Consumption
- Others can install the latest version:
- Or pin a specific version:
7.3 Docker images
7.3.1 Why Docker
Docker packages your app plus dependencies into a lightweight, portable container so it behaves consistently in dev, test, and prod environments.
Benefits:
- Environment parity – no more "works on my machine".
- Easy deployment and scaling across servers, Kubernetes, or the cloud.
- Industry-standard distribution with a public catalog on Docker Hub.
7.3.2 Register on Docker Hub
- Create an account at Docker Hub. The username becomes your namespace.
7.3.3 Create a repository
- Click Create a repository.
- Provide the repository name (e.g.,
my-project) and visibility (public/private). - Click Create.
7.3.4 Sign in from the CLI
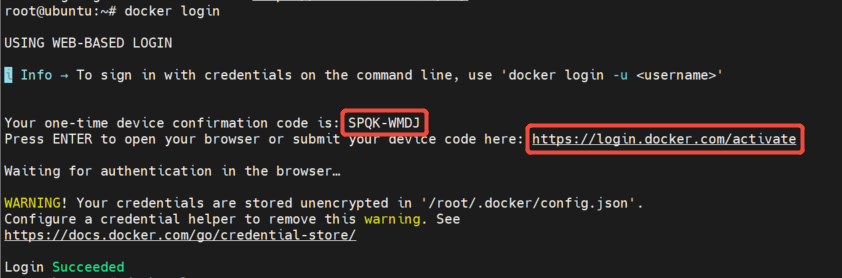
- Run:
- Open https://login.docker.com/activate, enter the activation code from the CLI, and you should see
Login Succeeded.
7.3.5 Build and push the image
- Edit the
Dockerfile:
# 1. Choose the base image
FROM python:3.10

# 2. Configure environment variables
ENV PYTHONUNBUFFERED=1

# 3. Create the application folder
RUN mkdir /app

# 4. Copy the source code
COPY my_project /app/my_project
COPY requirements.txt /tmp/requirements.txt
ENV PYTHONPATH="/app:${PYTHONPATH}"

# 5. Install dependencies
RUN pip install -r /tmp/requirements.txt     && rm -rf /tmp/requirements.txt

# 6. Create a non-root user for security
RUN useradd -m myuser
USER myuser

# 7. Default entrypoint
CMD ["/bin/bash"]
- Build the image:
- Push it to Docker Hub:
7.3.6 Use the image
- Pull it:
- Start a container: