Chapter 18 High-level RAG: Agentic RAG
In the previous tutorial, we learned how to build a RAG system, as well as improve the performance, speed optimization, function expansion, etc. of the RAG system. In this tutorial, we will further introduce the recently popular Agentic RAG on this basis. It is a variant of RAG, but more intelligent. Let's get started!
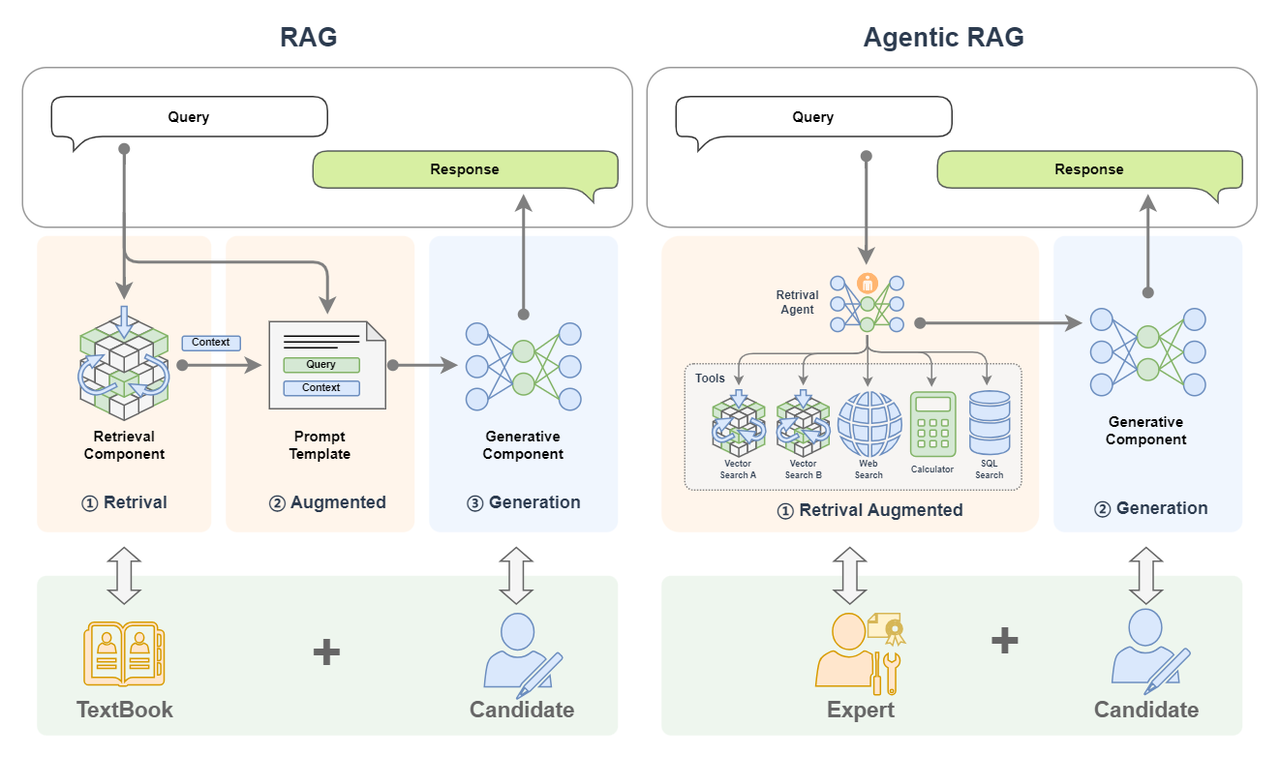
If RAG is compared to a candidate who goes to the exam with books, then Agentic RAG is a candidate who goes to the exam with teacher and books at the same time!
Agentic RAG is a RAG that integrates AI Agent. This article will first introduce Agentic RAG based on concepts such as RAG and AI Agent; then introduce the basic principles and components of Agentic RAG in detail; then introduce why Agentic RAG is used and compare it with traditional RAG; and finally introduce how to build an Agentic RAG.
Basic concepts
What is Agentic RAG? Let us break down this complex concept into RAG and AI Agent (Agentic introduces AI Agent) and introduce them one by one.
1. Review of RAG system
First let's review the basic concepts of RAG.
Basic concepts
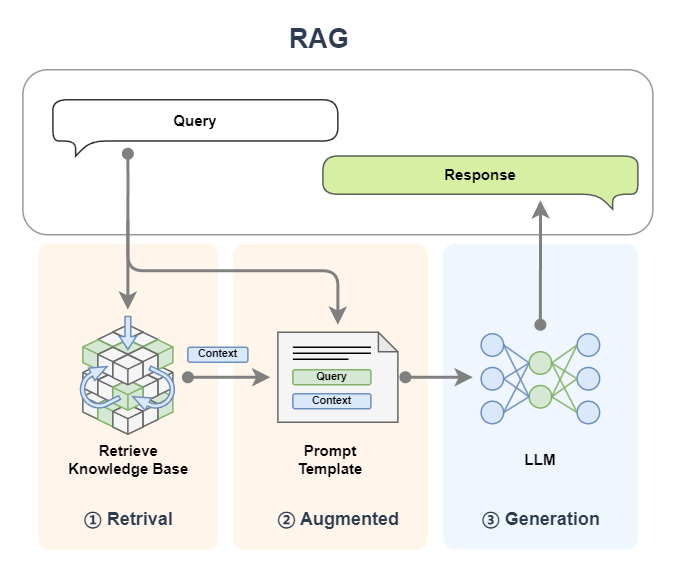
Retrieval-Augmented Generation (RAG) technology is a technology that uses plug-in knowledge sources to supplement the context of large language models to strengthen the input, thereby improving the quality of content generated by large language models and reducing hallucinations (hallucinations are unreal content generated by LLM confidently fabricating information at will). For example, RAG is a candidate who takes a book with him to take an exam. The test questions are the input, the book is the plug-in knowledge base, the candidates are the big model, and the content of the candidates' answers is the content generated by the big model. Generally speaking, if you can take a closed-book exam with a textbook, the score on the answer sheet will be very high. This is an image explanation of how RAG can improve the quality of content generated by large models.
Basic components
RAG mainly consists of two components:
- Retrieval Component: The retrieval component is used to match information in the knowledge base based on input. For example, it is to search for answers in textbooks with test questions.
- Generative Component: The Generative Component is used to send the input and retrieved information to the large model to generate high-quality responses. For example, the candidate answers the test questions by combining the questions and the content found in the textbook.
Workflow
The name RAG (Retrieval-Augmented Generation) has revealed the workflow of this technology. Let us combine the diagram and disassemble the name to see:
- First we enter a query:
- Retrieval: retrieval, the query is first used to retrieve in a knowledge base (the details of embedding, vectorization and other aspects in RAG are simplified here. For details, please see the previous tutorial Basic 2: Getting to know RAG. The documents and query in the knowledge base will be vectorized for similarity calculation. Vector Search in the figure below Corresponding to the search of the knowledge base);
- Augmented: Enhanced, splicing the retrieved content (context) with the query we input to achieve the effect of enhancing the query;
- Generation: Generation. Send the enhanced query in the previous step to the LLM large model to generate the reply content.
- Return the generated content.

2. Introduction to AI Agent
Basic concepts
First of all, what is Agent? A common translation in Chinese is: agent. When we want to do something, there are generally two ways. We can achieve it step by step by ourselves; the other is to find someone, who is called an agent. We give the agent full authority without caring about what he does, as long as he can help us achieve our goal. In the former we need to worry about every detail, while in the latter we can sit back and enjoy the results. Therefore, one of the characteristics of Agent is that we do not need to care about the details of completing a certain task, but we only need to trust him to give the task to him and let him help us achieve it.
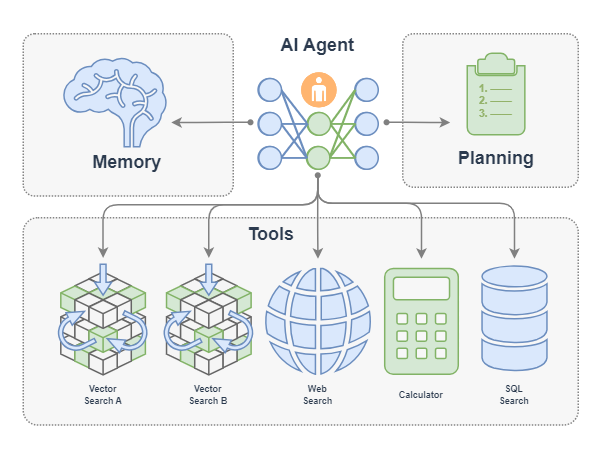
Returning to the AI Agent, an AI Agent is generally considered an LLM with specific roles and tasks, and it can access memory and external tools. But I think the AI agent is more like a person, an agent we invite. I prefer to compare it to a person with a high degree of professional ability - an expert. LLM is its brain. With its smart brain, it can automatically plan steps and take repeated actions (such as calling tools) based on feedback to solve the task at hand. We don't need to worry about the whole process, we just need to let him do it!
Imagine that you are a king. When you want to expand your territory, you do not need to do it yourself. You only need to find an agent - your general (that is, an expert in leading troops in combat). Delegate power to the general and let the general do it. He will plan the battle plan (planning), deploy troops (call tools), and charge into battle (take action). You just have to wait for the good news of his triumph. This general is like our AI agent.
Basic components
An AI Agent mainly consists of the following components:
- LLM: This is the brain of the intelligent agent, corresponding to the brain of the general;
- Memory: The memory of the intelligent agent corresponds to all the memories of the general from the beginning to the end of a certain territorial expansion mission, even the memory of previous battles;
- Planning: The intelligent agent can reflect, self-criticize, automatically route (take action), etc., which corresponds to the king delegating power to the general, allowing him to complete the task according to his own ideas;
- Tools: They are tools that the agent can call, corresponding to the troops that the general can call, the weapons that can be used, etc.;
Workflow
AI Agent has many types of workflows. Here are some common workflows: Function Call Agent, ReAct, PlanAndSolve and ReWOO. The workflow of an AI agent is mainly its behavior pattern, which is like a person's behavioral habits of doing things:
- Function Call Agent: After the agent receives a task, it will continue to try to call the tool with various parameters and observe the output until the problem is solved or the maximum number of repetitions is reached.
- ReAct: After the agent receives the task, it will think first, then try to call the tool and observe the output, and repeat this process until the problem is solved or the maximum number of repetitions is reached.
- PlanAndSolve: After receiving the task, the agent will first plan to decompose the task, and then try to solve the current step task. Based on the results of the current step, it will continue to execute the task or re-plan subsequent tasks until the task is solved or the maximum number of repetitions is reached.
- ReWOO: After receiving the task, the agent will first plan to decompose the task, then complete all steps, and provide feedback based on the results of all steps.
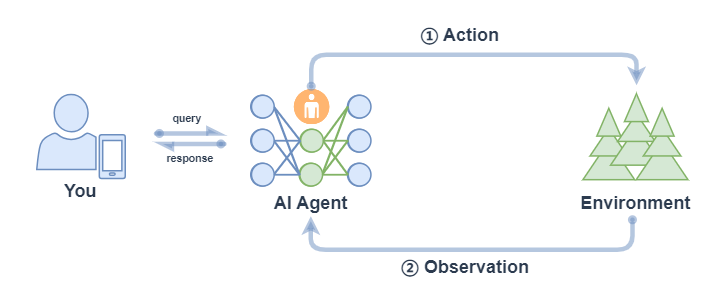
Function Call Agent
Function Call Agent mainly includes the following processes:
- Action: After the Agent receives a query, it will take direct action, such as calling a tool;
- Observation: Agent observes feedback from actions, such as the output of a tool.
The above process will continue in a loop. If the feedback of the observed action is OK, meets the requirements of the query, or reaches the maximum number of iterations, then the Agent will exit and return the result response.
We can use AI Agent in LazyLLM. First define the tool, and then register the defined tool into LazyLLM. After that, we can define the model and use FunctionCall Agent:
from typing import Literal
import json
import lazyllm
from lazyllm.tools import fc_register, FunctionCall, FunctionCallAgent
@fc_register("tool")
def get_current_weather(location: str, unit: Literal["fahrenheit", "celsius"] = "fahrenheit"):
    ...
@fc_register("tool")
def get_n_day_weather_forecast(location: str, num_days: int, unit: Literal["celsius", "fahrenheit"] = 'fahrenheit'):
    ...
llm = lazyllm.TrainableModule("internlm2-chat-20b").start()  # or llm = lazyllm.OnlineChatModule()
tools = ["get_current_weather", "get_n_day_weather_forecast"]
fc = FunctionCall(llm, tools)
query = "What's the weather like today in celsius in Tokyo and Paris."
ret = fc(query)
print(f"ret: {ret}")
agent = FunctionCallAgent(llm, tools)
ret = agent(query)
print(f"ret: {ret}")
React
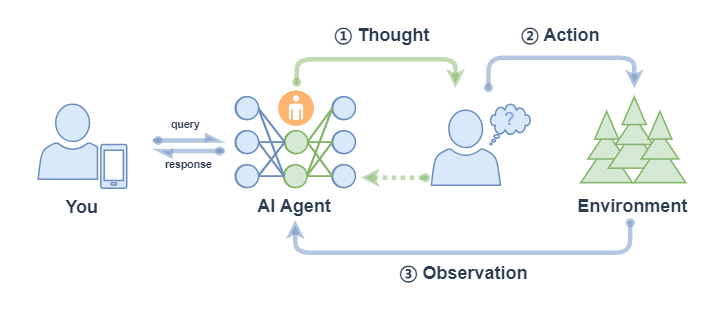
React mainly includes the following processes:
- Thought: After the Agent receives the query, it will first give the next action to be taken;
- Action: Agent will take and execute an action, such as using a tool (or continuing to think);
- Observation: Agent observes feedback from actions, such as the output of a tool;
The above process will continue to repeat until the query request is satisfied or the maximum number of iterations is reached.
The execution process of ReactAgent is the same as that of FunctionCallAgent. The only difference is that the prompt is different, and ReactAgent must have Thought output at each step, while an ordinary FunctionCallAgent may only output information about tool calls without content. Examples are as follows:
import lazyllm
from lazyllm.tools import fc_register, ReactAgent
@fc_register("tool")
def multiply_tool(a: int, b: int) -> int:
return a * b
@fc_register("tool")
def add_tool(a: int, b: int):
return a + b
tools = ["multiply_tool", "add_tool"]
llm = lazyllm.OnlineChatModule(source="sensenova", model="DeepSeek-V3")
agent = ReactAgent(llm, tools)
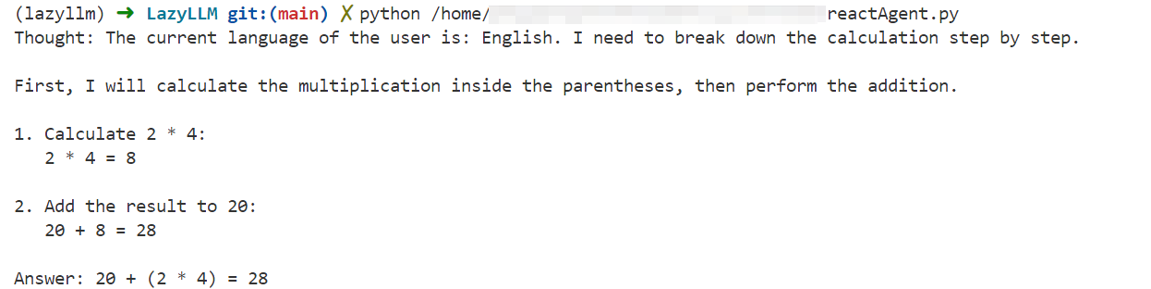
query = "What is 20+(2*4)? Calculate step by step."
res = agent(query)
print(res)
PlanAndSolve
PlanAndSolve mainly includes the following processes:
- Plan: After the Agent receives the query, it will decompose the task into smaller subtasks;
- Action: Agent executes the current subtask;
- Observation: Agent observes the results of the current action and returns if the problem is solved. If it only solves the current subtask, it continues to execute the plan. If the current subtask is not solved, it re-plans the subsequent steps;
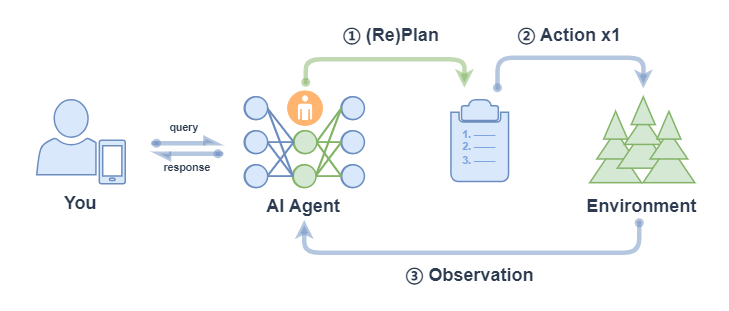
Note: ② Action x1 in the above figure means that each action only executes one sub-task (not all sub-tasks will be executed, which is different from ② Action xN in the corresponding process of ReWOO).
PlanAndSolveAgent consists of two components: first, breaking the entire task into smaller subtasks, and second, executing these subtasks according to the plan. The final result is output as the answer.
import lazyllm
from lazyllm.tools import fc_register, PlanAndSolveAgent
@fc_register("tool")
def multiply(a: int, b: int) -> int:
    return a * b
@fc_register("tool")
def add(a: int, b: int):
    return a + b
llm = lazyllm.OnlineChatModule(source="sensenova", model="DeepSeek-V3")
tools = ["multiply", "add"]
agent = PlanAndSolveAgent(llm, tools=tools)
query = "What is 20+(2*4)? Calculate step by step."
ret = agent(query)
print(ret)

ReWOO
ReWOO (Reasoning WithOut Observation) mainly includes the following processes:
- Plan: After the Agent receives the query, it will generate a plan, which contains smaller subtasks decomposed by the task. The execution results between the subtasks are represented by placeholders;
- Action: Agent executes each sub-task in turn (calling tools) and fills the results into the placeholders of the schedule;
- Solve: Agent observes the feedback of all actions and returns the result response to the user;
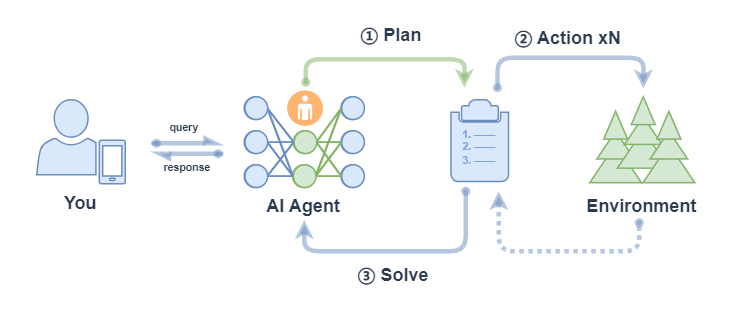
ReWOOAgent consists of three parts: Planner, Worker and Solver. Among them, Planner uses predictive reasoning capabilities to create solution blueprints for complex tasks; Worker interacts with the environment through tool calls and fills actual evidence or observations into instructions; Solver processes all plans and evidence to formulate solutions to the original task or problem.
import lazyllm
from lazyllm import fc_register, ReWOOAgent, deploy
import wikipedia
@fc_register("tool")
def WikipediaWorker(input: str):
    try:
        evidence = wikipedia.page(input).content
        evidence = evidence.split("\n\n")[0]
    except wikipedia.PageError:
        evidence = f"Could not find [{input}]. Similar: {wikipedia.search(input)}"
    except wikipedia.DisambiguationError:
        evidence = f"Could not find [{input}]. Similar: {wikipedia.search(input)}"
    return evidence
@fc_register("tool")
def LLMWorker(input: str):
    llm = lazyllm.OnlineChatModule(stream=False)
    query = f"Respond in short directly with no extra words.\n\n{input}"
    response = llm(query, llm_chat_history=[])
    return response
tools = ["WikipediaWorker", "LLMWorker"]
llm = lazyllm.TrainableModule("Qwen2-72B-Instruct-AWQ").deploy_method(deploy.vllm).start()
agent = ReWOOAgent(llm, tools=tools)
query = "What is the name of the cognac house that makes the main ingredient in The Hennchata?"
ret = agent(query)
print(ret)

Let us briefly summarize it as follows:
| Function Call Agent | ReAct | PlanAndSolve | ReWOO | |
|---|---|---|---|---|
| Workflow | Loop within the maximum number of loops: - Call the tool with trial parameters; - Observe the tool output, and end the loop when the task is completed. |
Maximum number of loops within the loop: - Thinking; - Test parameters to call the tool; - Observe the tool output, and end the loop when the task is completed. |
Maximum number of loops within the loop: - (Re) plan and decompose the task; - Call the tool to solve the current subtask; - Observe the tool output, determine whether the subtask is completed, and end the cycle when the entire task is completed |
- Plan and decompose the task; - Call the tool to solve all subtasks step by step - Comprehensive results of all steps for feedback |
| Work characteristics | Simple and direct, the thinking process is invisible | Introducing thinking links, making thinking visible | Emphasis on task decomposition and dynamic adjustment of tasks | Emphasis on overall planning and comprehensive feedback |
Simplify Agent workflow
In Agent development, problems such as reinventing the wheel, inconsistent tool interfaces, and complex context management make the development process lengthy and inefficient. In order to solve these difficulties, we can improve development efficiency and lower the threshold through the "MCP Protocol+LazyLLM" framework, allowing developers to focus on core business and innovative design, thus promoting the faster implementation of large model applications.
Basic concepts of MCP protocol
MCP (Model Context Protocol) is an open standard protocol launched by Anthropic in November 2024, aiming to allow large language models to "seamlessly connect" external tools and data sources. To put it simply, MCP is a "standardized weapon" that is created to solve the pain points at the beginning. A more vivid metaphor is: MCP is equivalent to the USB-C interface for AI applications**.
Just as USB-C unifies the charging and data interfaces of electronic devices of different brands, MCP standardizes the way in which AI interacts with the external world, allowing models to efficiently call databases, tools, network searches and other resources in a standardized form, thereby achieving efficient linkage between models and external systems. In other words, in the past, every time a new tool was connected, there was a big problem of "interface non-uniformity". With MCP, it is like using peripherals with unified interfaces. Plug it in and use it. In this way, there is no need for secondary development**, and a variety of databases, Web APIs, file systems, GitHub... massive and powerful functions can all be easily accessed through this protocol.
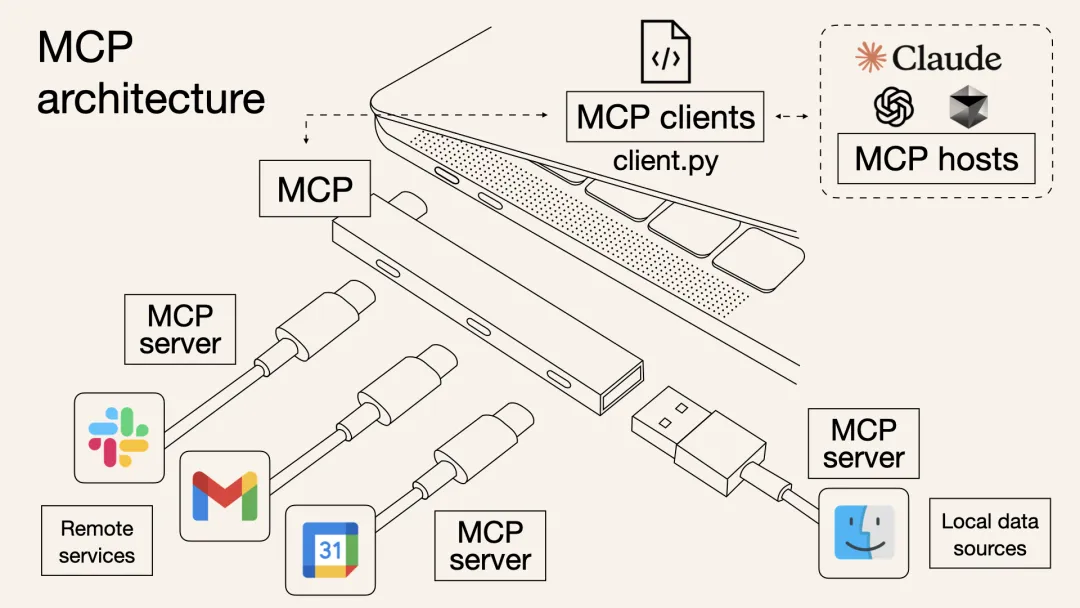
In the past, if you wanted the AI Agent to check the weather, read PDFs, and execute Python code, you might need to write a bunch of integrated code for each function, including the description of the tool, input parameters, etc., and package it into a "Tool" and give it to the model; with MCP, you only need to connect an MCP server that meets the requirements, and the model will automatically know what tools are available and how to call them, and the input and output formats are also unified.

The whole process is like plugging in a docking station to a laptop. The protocol will help you with the tedious docking details such as HDMI, SD card, network cable and other interfaces. From now on, developers don't need to worry about those conversion processes. Therefore, the emergence of MCP has greatly improved the efficiency of AI Agent application development. **
Technical architecture of MCP
From a technical architecture perspective, MCP follows a typical client-server model, which decouples the internal logic and external extension functions of AI applications into three core modules:
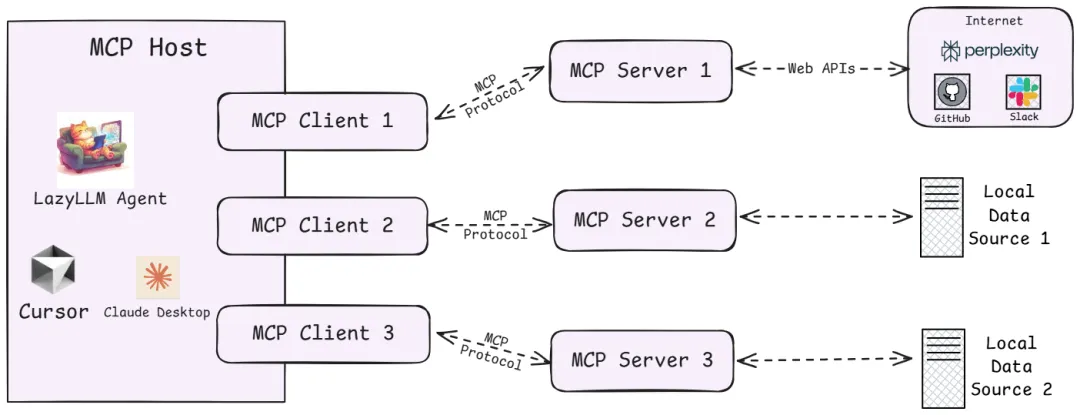
1. Host
Refers to the host environment that runs the AI application itself (similar to IDE plug-ins that support AI dialogue such as Cursor, desktop applications such as Claude Desktop, and the agent applications we created). Host is responsible for providing the AI interactive environment and starting the MCP Client internally.
2. Client
The client running inside the Host establishes a connection with the MCP Server and acts as a bridge between the AI application and the external world. The MCP client maintains a 1:1 connection with the server. When the AI model needs to call tools or obtain data, the client communicates with the server according to the protocol.
3. Server
The MCP server provides specific functions and data, which is equivalent to the peripherals that the AI brain can call remotely. Several types of content are usually exposed on a server for AI to use:
- Tools: Functions that allow large model calls. For example, code execution, web browsing, sending emails, etc., these capabilities can be packaged by the server as callable tools and provided to AI.
- Resources: Data or content provided to the large model. For example, database records, file contents, screenshots of web browsing, etc. The server can send these external data to the AI application through the protocol to serve as the context of LLM.
- Prompts: preset reusable prompt word templates or interactive workflows. Server can store some commonly used prompt words and provide them to AI on demand to avoid writing complex prompts from scratch every time.
More details of MCP technical architecture can be found at: https://modelcontextprotocol.io/docs/concepts/architecture
Through the above architecture, problems that were solved patchworkly in the past now have clear protocol specifications to follow. So, what is the relationship between these terms, MCP, Agent, LLM, Tool Call...?
- LLM is the "brain" of the Agent, which can output corresponding text content based on input information (such as system prompt words, user instructions, historical dialogue information, available tool set information, etc.), which may be staged tool call information, or may be the final output content after the task is completed.
- Tool Call is a tool calling capability acquired by LLM after extensive training. This capability allows LLM to synthesize historical information and available tool information, dynamically make decisions and output formatted tool calling instructions (deciding which tool to use and what parameters to pass in when calling the tool). This instruction guides the Agent to correctly complete the tool call, thereby achieving specific actions (such as operating files, executing code), and obtaining necessary information (such as returning web crawler results).
- MCP Server is a tool provider that follows the MCP protocol. It provides the Agent with a powerful tool set for LLM to identify and execute Tool Calls. At the same time, it receives the Tool Call instructions given by the Agent and safely interacts with external resources to implement specific actions or return specific information.
- Agent serves as the only entrance for interaction between the agent application and the user. After receiving the task instructions, it will call LLM and various tools in an orderly manner to complete the task.
Practice: Using MCP with LazyLLM
For MCP, LazyLLM provides two access methods: direct access and deployment and remote access.
- ** Direct access: ** Directly give the startup configuration of the specified MCP Server to lazyllm.tools.MCPClient, start the Server in Stdio mode, and obtain the tool set that the Agent can call.
- ** Deployment and remote access: ** For some scenarios where resource usage is high, or the started MCP Server is expected to be reusable, LazyLLM supports one-click deployment of MCP Server. With just one line of commands, the MCP Server can be started separately, and then the MCP Server can be remotely accessed in SSE mode.
Specifically, the steps are as follows:
- Configure all dependencies required by LazyLLM
First refer to the Getting started section of https://docs.lazyllm.ai/zh-cn/latest/ to install LazyLLM and complete the environment configuration. At the same time, since the use of MCP Server relies on Node.js and npm, you can refer to https://nodejs.org/en/download to complete the installation and configuration of the latest version.
- Utilize existing MCP services
If you need to access existing MCP services (such as the geographical location service of Amap), you can directly connect through LazyLLM's MCPClient tool without deploying the server yourself.
SSE URL access (taking AutoNavi MCP as an example): No need to start the local server, configure the client directly through the SSE long connection URL provided by the service provider. You need to replace "xxx" with your own key.
(Create key: https://lbs.amap.com/api/mcp-server/create-project-and-key)
import lazyllm
from lazyllm.tools.agent import ReactAgent
from lazyllm.tools import MCPClient
mcp_configs = {
"amap_mcp": {
"url": "http://mcp.amap.com/sse?key=xxx"
}
}
client = MCPClient(command_or_url=mcp_configs["amap_mcp"]["url"])
llm = lazyllm.OnlineChatModule(source='qwen', model='qwen-max-latest', stream=False)
agent = ReactAgent(llm=llm.share(), tools=client.get_tools(), max_retries=15)
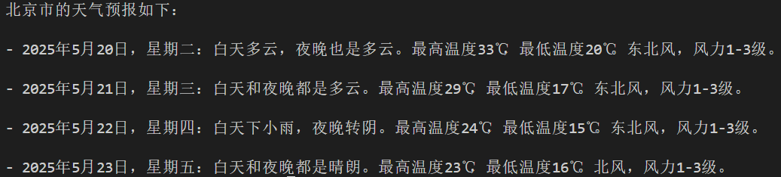
print(agent("Check the weather in Beijing"))
-
Use direct access to call MCP
-
Configuration acquisition
We select a file management MCP Server and obtain the startup configuration:
{
    "mcpServers": {
        "filesystem": {
            "command": "npx",
            "args": [
                "-y",
                "@modelcontextprotocol/server-filesystem",
                "/Users/username/Desktop"
            ]
        }
    }
}
Note that if you are using a Windows system, you need to use "cmd" for command, and "/c" needs to be added to the beginning of the startup parameters. There will be some changes to the startup configuration:
{
    "mcpServers": {
        "filesystem": {
            "command": "cmd",
            "args": [
                "/c",
                "npx",
                "-y",
                "@modelcontextprotocol/server-filesystem",
                "/Users/username/Desktop"
            ]
        }
    }
}
- MCP access
You can then use LazyLLM's MCPClient tool to access the MCP Server (the path example here is /xxx/xxx/xxx).
import lazyllm
from lazyllm.tools import MCPClient
config = {"command": "npx", "args": ["-y", "@modelcontextprotocol/server-filesystem", "/xxx/xxx/xxx"]}
client = MCPClient(command_or_url=config["command"], args=config["args"], env=config.get("env"))
- Toolset acquisition
>>> tools = client.get_tools()
Secure MCP Filesystem Server running on stdio
Allowed directories: [ '/Users/username/Desktop' ]
>>> tools
[<function generate_lazyllm_tool.<locals>.dynamic_lazyllm_func at 0x7f269cad11c0>, <function generate_lazyllm_tool.<locals>.dynamic_lazyllm_func at 0x7f269c91e520>, <function generate_lazyllm_tool.<locals>.dynamic_lazyllm_func at 0x7f269c91d800>, <function generate_lazyllm_tool.<locals>.dynamic_lazyllm_func at 0x7f269c91d8a0>, <function generate_lazyllm_tool.<locals>.dynamic_lazyllm_func at 0x7f269c91e5c0>, <function generate_lazyllm_tool.<locals>.dynamic_lazyllm_func at 0x7f269c91e0c0>, <function generate_lazyllm_tool.<locals>.dynamic_lazyllm_func at 0x7f269c91d940>, <function generate_lazyllm_tool.<locals>.dynamic_lazyllm_func at 0x7f269c91e480>, <function generate_lazyllm_tool.<locals>.dynamic_lazyllm_func at 0x7f269c91db20>, <function generate_lazyllm_tool.<locals>.dynamic_lazyllm_func at 0x7f269c91da80>, <function generate_lazyllm_tool.<locals>.dynamic_lazyllm_func at 0x7f269c91dda0>]
Code explanation: Call client.get_tools() to obtain all the tools in the currently connected MCP Server (in an asynchronous environment, the following code can be changed to tools = await client.aget_tools()). At the same time, LazyLLM supports developers to obtain a specific tool set by passing in a list of tool names to the method, such as client.get_tools(["tool_name1", "tool_name2"]).
- Tool call
>>> for t in tools:
...     print(f"\nTool name:\n{t.__name__}\nTool desc:\n{t.__doc__}\nTool params:\n{t.__annotations__}\n")
...
Tool name:
read_file
Tool desc:
Read the complete contents of a file from the file system. Handles various text encodings and provides detailed error messages if the file cannot be read. Use this tool when you need to examine the contents of a single file. Only works within allowed directories.
Args:
    path (str): type: string.
Tool params:
{'path': <class 'str'>}
Tool name:
write_file
Tool desc:
Create a new file or completely overwrite an existing file with new content. Use with caution as it will overwrite existing files without warning. Handles text content with proper encoding. Only works within allowed directories.
Args:
    path (str): type: string.
    content (str): type: string.
Tool params:
{'path': <class 'str'>, 'content': <class 'str'>}
......
Tool name:
list_allowed_directories
Tool desc:
Returns the list of directories that this server is allowed to access. Use this to understand which directories are available before trying to access files.
Args:
    No parameters.
Tool params:
{}
Code explanation: Traverse the tools obtained from MCP Server, where each member is a function. Each functional function has a function name (name), function description (doc, including function description and parameter description), and parameter declaration (annotations). When calling the corresponding function, you only need to pass in the correct parameters. Here are two examples of function calls:
-
Call the file reading tool read_file and pass in the required input parameter path to obtain the return information after reading the file;
-
Call the tool list_allowed_directories to obtain authorized paths. This tool does not require any input parameters. Pass in nothing to get the tool return.
>>> t1 = tools[0]
>>> t1.__name__
'read_file'
>>> t1(path="xxx/xxx/xxx/test.md")
Secure MCP Filesystem Server running on stdio
Allowed directories: [ 'xxx/xxx/xxx' ]
'Tool call result:\nReceived text message:\nThis is a test file for LazyLLM and MCP.\n\nEnd\n'
>>> t2 = tools[-1]
>>> t2.__name__
'list_allowed_directories'
>>> t2()
Secure MCP Filesystem Server running on stdio
Allowed directories: [ 'xxx/xxx/xxx' ]
'Tool call result:\nReceived text message:\nAllowed directories:\n/xxx/xxx/xxx'
- Use LazyLLM to deploy MCP Server and access it
LazyLLM supports one-click deployment of MCP Server. With just one line of command, the MCP Server can be started separately. The main program can use SSE mode to access the MCP Server.
- Deploy MCP Server with one click
Select the browser tool playwright (https://github.com/microsoft/playwright-mcp) to obtain configuration information:
In the command line, you only need to use the "lazyllm deploy mcp_server xxxxxx" command and configure the host and port to complete the deployment of MCP Server. Since the Linux environment does not have a GUI, here is a demonstration of the startup command in the Windows environment:
After startup it looks like this:

- Access the deployed MCP Server
We can pass in the URL in other programs and access the MCP Server through SSE. Note that the URL here needs to be added with '/sse', otherwise it will not work properly:
>>> config = {"url": "http://127.0.0.1:11238/sse"}
>>> client = MCPClient(command_or_url=config["url"])
After accessing the MCP Server using the above method, the specific tool acquisition and tool calling methods are consistent with direct access.
5.LazyLLM calls the MCP tool
Step 1: Get a list of tools
tools = client.get_tools() # Synchronous acquisition
# Or tools = await client.aget_tools() # Asynchronous environment
Step 2: View tool details
for t in tools:
    print(f"Tool name: {t.__name__}")
    print(f"Tool desc: {t.__doc__}")
    print(f"Tool params: {t.__annotations__}\n")
Step 3: Call the MCP tool
Take the file reading tool as an example, assuming tools[0] is read_file.

6.LazyLLM+MCP agent Demo
Next, we use filesystem+playwright, combined with LazyLLM’s Agent module, to create an agent:
import lazyllm
import lazyllm.tools.agent
from lazyllm.tools import ReactAgent
import MCPClient
if __name__ == "__main__":
    mcp_configs = {
        "file_system": {
            "command": "cmd",
            "args": [
                "/c",
                "npx",
                "-y",
                "@modelcontextprotocol/server-filesystem",
                "./"
            ]
        },
        "play_wright": {
            "url": "http://127.0.0.1:11244/sse"
        }
    }
client1 = MCPClient(command_or_url=mcp_configs["file_system"]["command"], args=mcp_configs["file_system"]["args"])
client2 = MCPClient(command_or_url=mcp_configs["play_wright"]["url"])
llm = lazyllm.OnlineChatModule(source="deepseek")
agent = ReactAgent(llm=llm.share(), tools=client1.get_tools()+client2.get_tools(), max_retries=15)
print(agent("Browse Google News and write a today's news briefing, save it locally in markdown format."))
Through this practice, we can learn that the emergence of MCP Server directly eliminates the cost of tool development and debugging in the Agent development process, greatly improving research and development efficiency**. LazyLLM provides flexible access methods to MCP, allowing developers to greatly reduce the cost of using MCP.
Summary: In the era of large models, development efficiency is the core competitiveness. You may be able to practice by reinventing the wheel from scratch, but in the process of actual implementation of AI applications, we should reserve precious time and brainpower for the parts that truly create value - such as business logic design, user experience optimization, innovative interaction methods, etc., rather than re-creating basic components such as tools and context splicing.
MCP provides a set of efficient and unified standard protocols; LazyLLM provides a set of flexible MCP access solutions, allowing every developer to easily get started and quickly build their own smart Agent applications, so as to stand on the "shoulders" of the community and open source ecosystem to see further and do more.
Treat MCP rationally
Although MCP simplifies the development process, it is important to note its limitations:
- Dependency risk: Over-reliance on third-party MCP services may cause the business to be subject to external stability and policy changes.
- Tool selection: MCP does not solve a dilemma of the current Agent: when there are many tools, how to quickly and accurately select the most appropriate tool.
Developers should weigh their choices based on actual needs, give priority to trying MCP in lightweight scenarios, and gradually verify its applicability.
3. Introduction to Agentic RAG
Basic concepts
Agentic RAG is an extension of RAG that enhances the functionality of RAG by introducing AI agents, allowing the system to perform more complex tasks.
For example, if RAG is a candidate who brings books to the exam, and AI Agent is an expert, then Agentic RAG is a candidate who brings experts to the exam!
To put it simply, in the figure below, a single LLM is like a student taking a closed-book exam; if we bring a book to this student, we can get a RAG; if we replace the book with an expert, we can get an Agentic RAG.
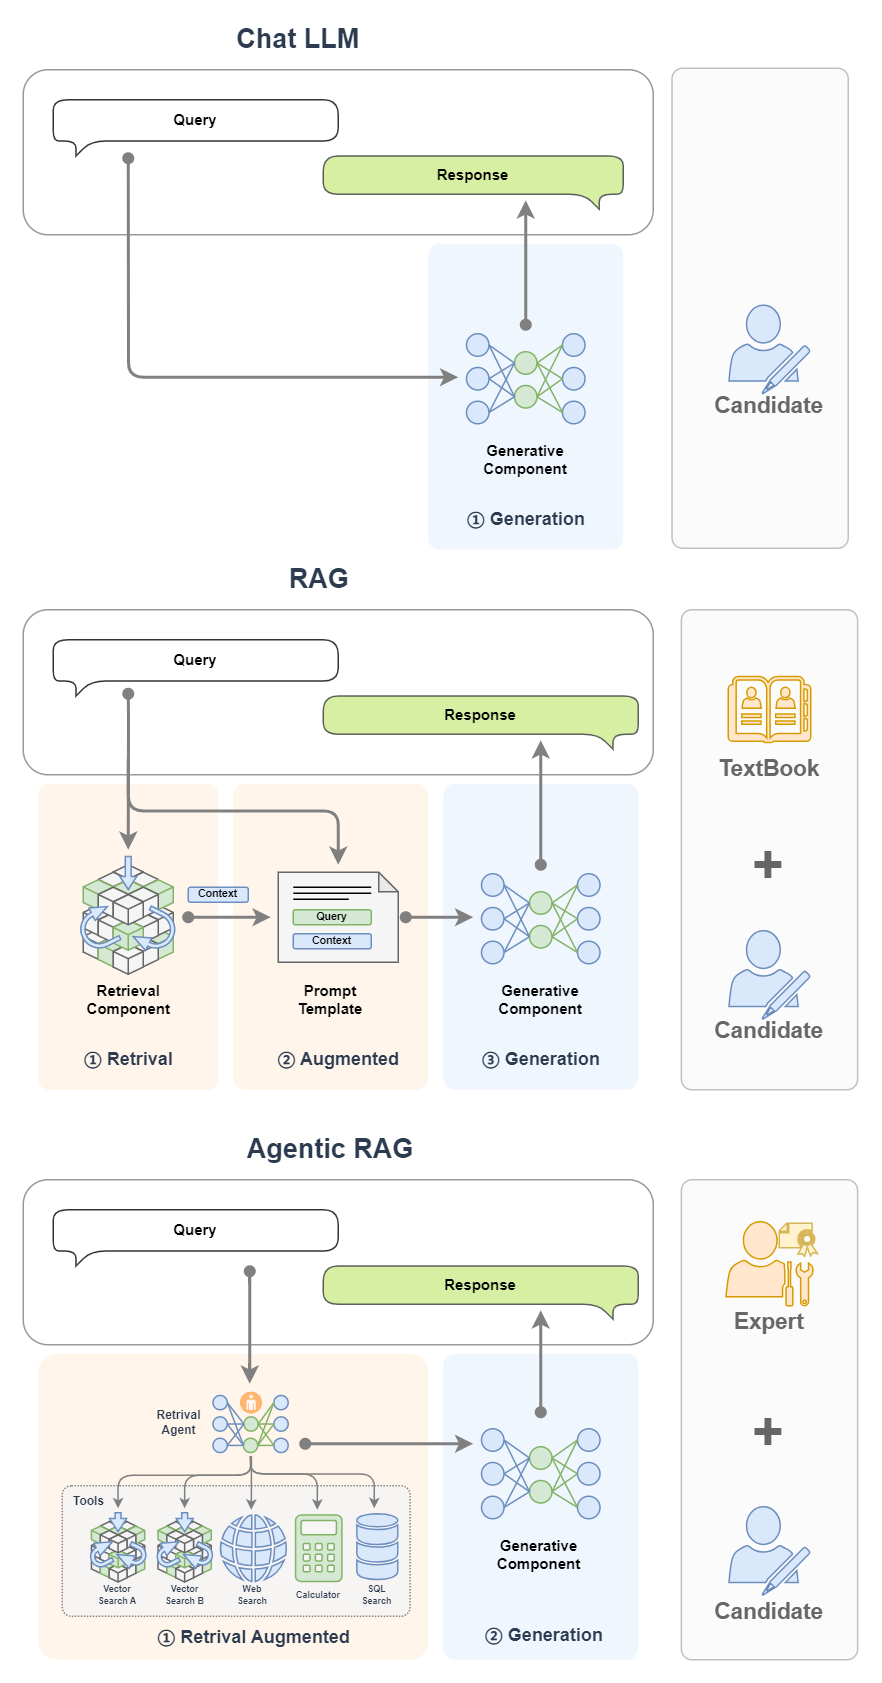
Basic architecture
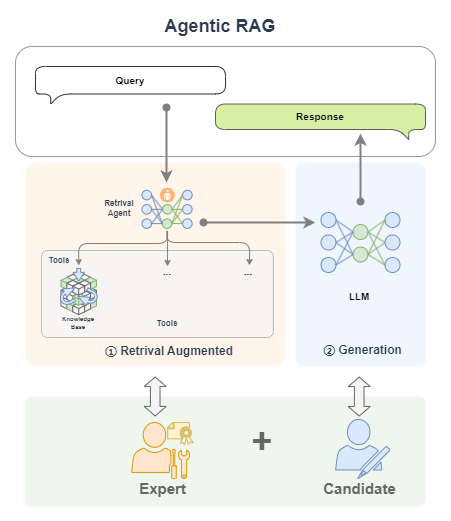
Agentic RAG is a RAG that introduces AI agents. In the previous example, we replaced RAG's search component (Retreival Component) with a single AI agent. In addition, we can also replace the search component with multiple AI agents, or even replace the Generative Component with an AI agent.
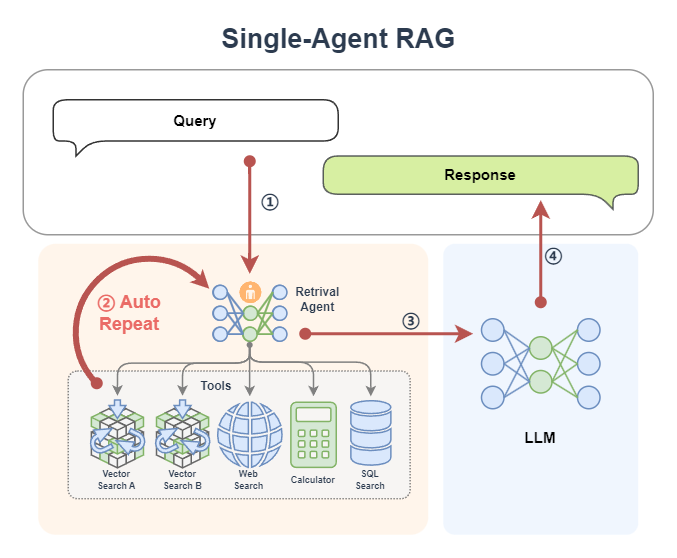
Single Agent RAG
Below is a common Agentic RAG, in which the AI Agent module provides two plug-in knowledge bases, a network search tool, a calculator and a database, so that the agent can decide where to retrieve information based on contextual needs. And if satisfactory information cannot be obtained in a round of retrieval, the agent can also search again (it can automatically change the search keywords, select different tools, etc.).
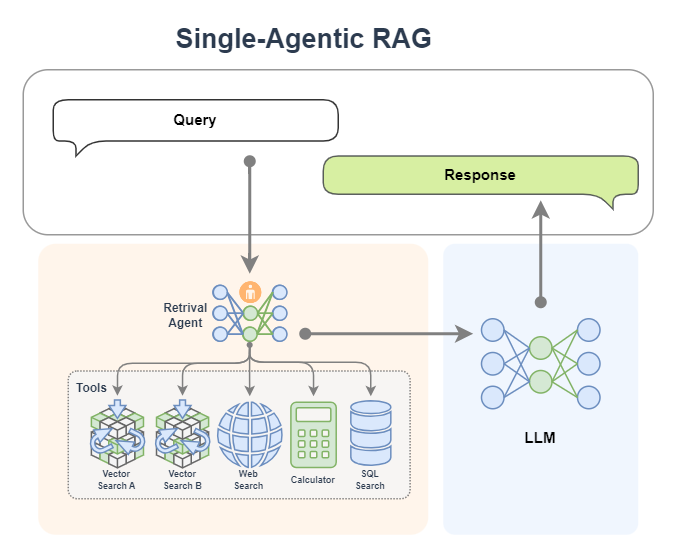
In Agentic RAG, AI agents can be integrated into the retrieval component to form a Retrieval Agent. The retrieval process becomes intelligent, and the agent can loop through the query and optimize the results dynamically. At the same time, intelligent agents can access multiple tools such as networks and databases to break through the limitations of a single knowledge base and obtain richer and more accurate contextual information.
The workflow of a single Agent RAG can be broken down into:
-
User input Query → Agent dynamically plans retrieval strategy
-
Multiple searches (changing keywords/tools) → multi-source data fusion
-
Result enhancement → LLM generated reply
After the introduction of agents, the query process is automated and intelligent, and the system can independently perform multiple rounds of searches, improving the information matching effect without manual intervention.
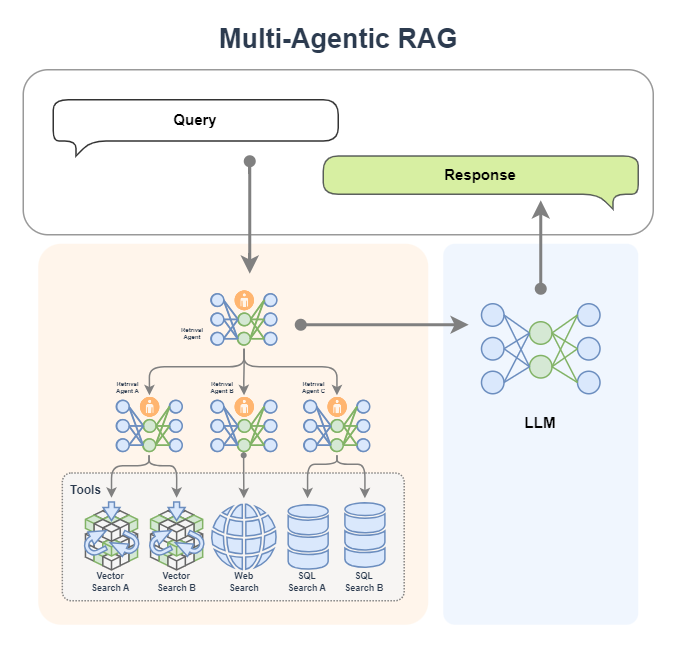
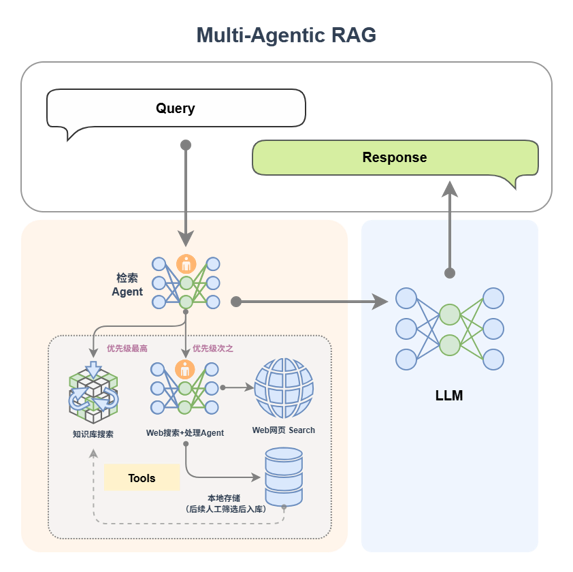
Multiple Agent RAG
We can also bring in a team of experts! Yes, it is a multi-Agent intelligence. In the figure below, the Retrieval Agent A expert is responsible for retrieval of two knowledge bases, the Retrieval Agent B expert is responsible for network search, and the Retrieval Agent C expert is responsible for the search of two databases. They are all search experts for various data sources. Finally, there is a Retreival Agent expert as the commander-in-chief, who is good at allocating search tasks.
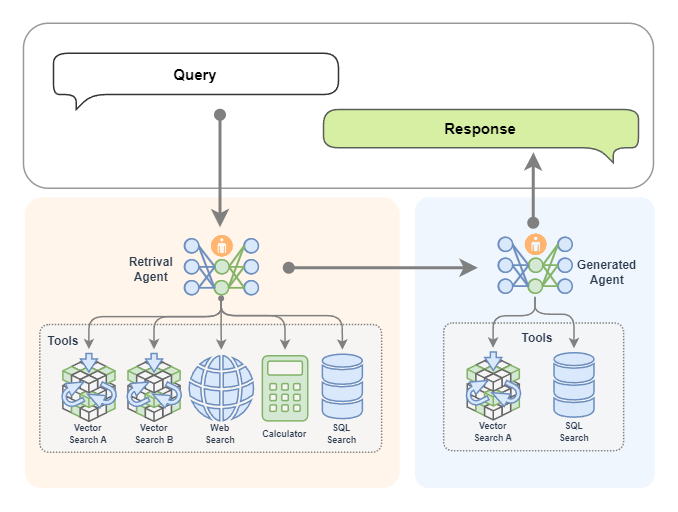
If you want, of course we can also replace the generation module with an AI agent, as shown in the figure below. In this way, we have two experts, one expert is responsible for retrieval, and the other expert is responsible for generating content. As shown in the figure below, the retrieval expert has many ways to make independent decisions to retrieve information. The generation expert can also generate content while searching. If it feels that the generated content is not satisfactory, it will automatically regenerate it!
Workflow
In Agentic RAG, AI agents can be integrated into different components. It is generally common to replace the retrieval component with an AI agent (become: Retrieval Agent). This also means that the retrieval component will become intelligent and can continuously retrieve according to the query to obtain richer and more accurate context. At the same time, because AI agents can access many tools, this greatly enhances their retrieval capabilities. Even if suitable content cannot be retrieved in the knowledge base, AI agents can obtain more content from the network, databases, or other accessible tools.
Let us take a single Agent RAG as an example, as shown in the figure below, to see how retrieval is completed under different agent workflows.
- First, a query is passed to the agent ①.
- If the agent is a Function Call Agent, then it will continuously call tools based on the query, and observe the queried information, and continue to loop ② until it queries information that satisfies it, or reaches the maximum number of cycles;
- If the agent is React, then it first thinks based on the query, then starts to call the tool, and observes the queried information, and continues to cycle ② until it queries information that satisfies it, or reaches the maximum number of cycles;
- If the agent is PlanAndSolve, then it will first make a plan based on the query and decompose the query task into subtasks, and then it will start to execute the subtasks, such as calling a tool to query the knowledge base. After the knowledge base returns the information, it will observe the results. If the results are not satisfied, it will re-modify the plan. If the results are OK, it will continue to execute the next subtask along the plan, and this will continue to cycle ② until it finally completes all the tasks it has formulated to obtain the query information;
- If the agent is ReWOO, then it will also make a plan based on the query, decompose the query task into subtasks, then it will execute all the subtasks in sequence②, and finally it will synthesize all the execution results to give the results of its query.
- After the agent queries the information, it returns to the classic RAG workflow: the queried information (already the result of the query fusion and enhancement by the agent) ③ will be sent to the LLM to complete the content generation task ④.
At this point, a single-Agent RAG workflow is completed. From this we can see that in the query stage, since we introduced the agent, the query becomes more intelligent. The agent will continue to query on its own. We don't have to worry about the query process and worry about not finding matching information after searching only once.
Introduce motivation
Agentic RAG simply replaces its components with agents in the workflow of the original RAG. Why is this so? Why create Agentic RAG? Or why introduce agents into RAG? A very simple reason is to make it more powerful! More intelligent.
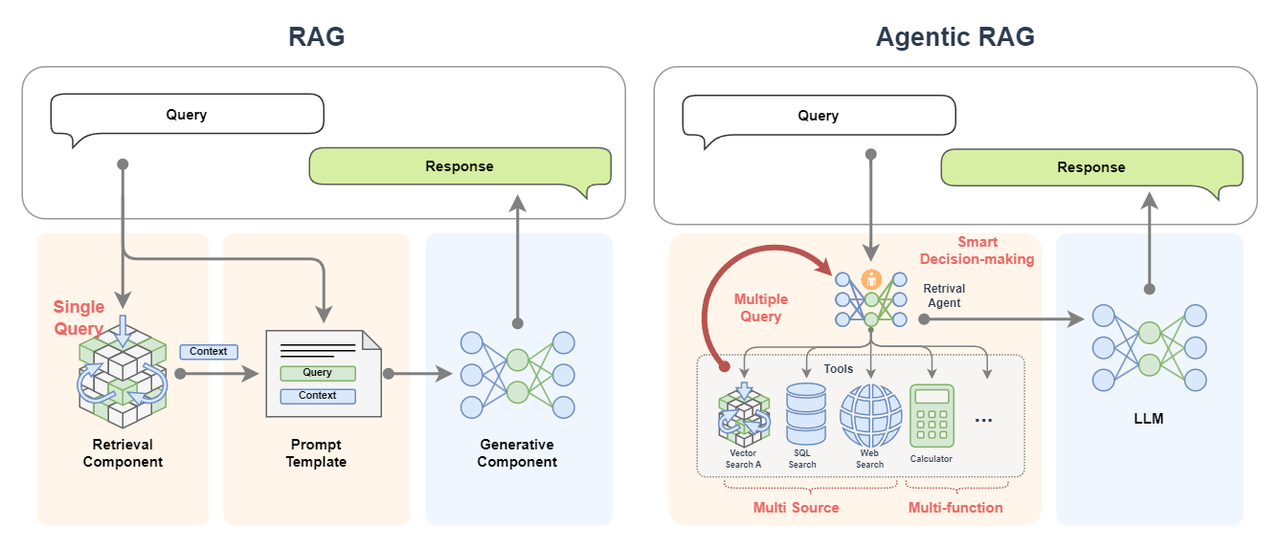
- Classic RAG only performs a single query. If the appropriate document information cannot be recalled in a single time, the effect of the subsequent generation process cannot be guaranteed. However, Agentic RAG can perform multiple queries. If the recall effect is not good, the agent will automatically change the representation method or change the tool for retrieval;
- The data source of classic RAG is very single, often with only one knowledge base. But Agentic RAG can access a large number of knowledge bases, and more than that, it can also access databases and even Internet searches, which means that Agentic RAG's data sources are diverse (multi source);
- Diverse data sources can not only supplement the insufficient information of a single data source, but also provide more information;
- Diverse data sources can also provide mutual corroboration of the queried information to ensure the accuracy of the query results;
- Agentic RAG also has the ability to call multiple tools, which is full of unlimited functions (multi-function), and it can process and process information;
- Agentic RAG More importantly, it can make intelligent decisions (smart decision-making)! It can automatically formulate plans to implement complex query processes. The whole process doesn't require us to worry about.
You can imagine this is the difference between taking a textbook with you and taking an exam with an expert!
Build implementation
Let’s start with a basic RAG, then demonstrate how to register tools in LazyLLM and use React AI agents, and finally combine the two to implement a simple Agentic RAG.
1. Build a basic RAG
Based on the previous tutorial, we can use LazyLLM to quickly build a RAG application. The logic of the application is as follows:
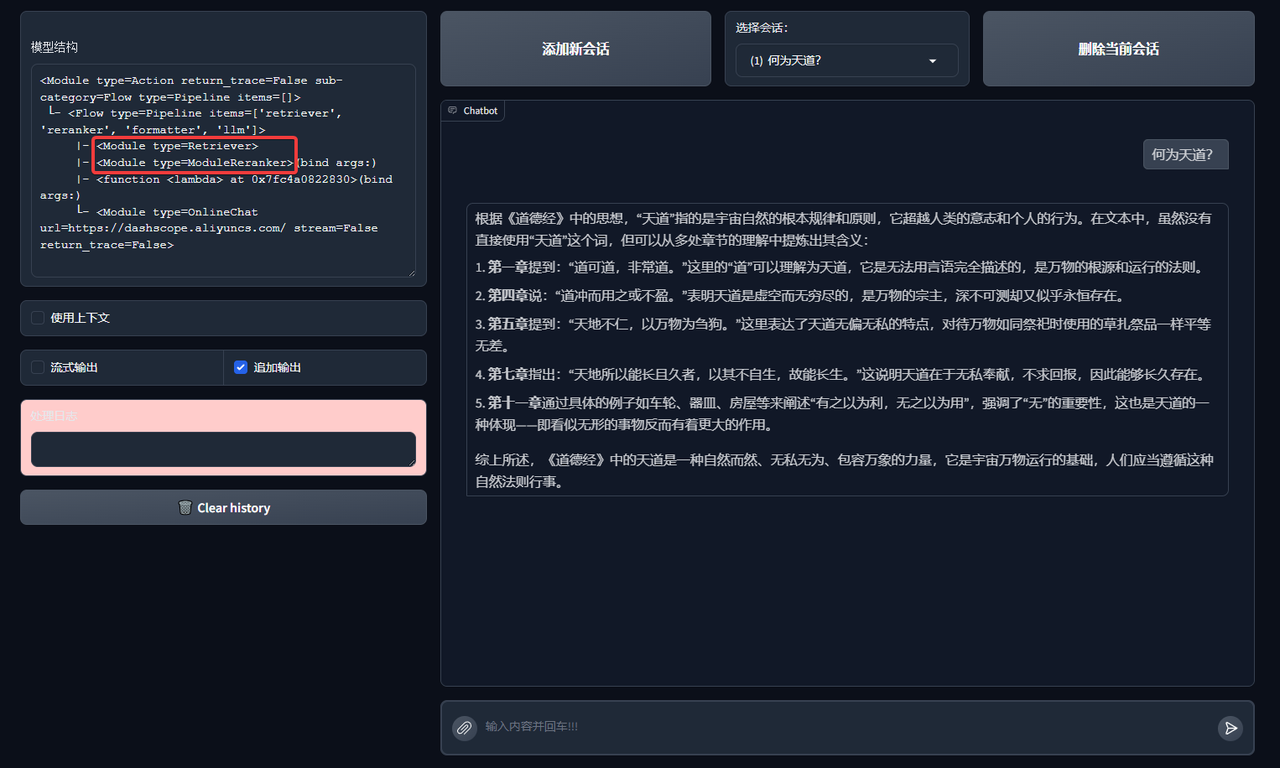
The specific code is as follows. In this RAG, we set up a retriever Retriever and Reranker to retrieve the knowledge base. Code GitHub link
import lazyllm
from lazyllm import pipeline, bind, OnlineEmbeddingModule, SentenceSplitter, Document, Retriever, Reranker

prompt = 'You will play the role of an AI Q&A assistant and complete a dialogue task. In this task, you need to provide your answer based on the given context and question.'

documents = Document(dataset_path="rag_master", embed=OnlineEmbeddingModule(), manager=False)
documents.create_node_group(name="sentences", transform=SentenceSplitter, chunk_size=1024, chunk_overlap=100)

with pipeline() as ppl:
    ppl.retriever = Retriever(documents, group_name="sentences", similarity="cosine", topk=1)
    ppl.reranker = Reranker("ModuleReranker", model=OnlineEmbeddingModule(type="rerank"), topk=1, output_format='content', join=True) | bind(query=ppl.input)
    ppl.formatter = (lambda nodes, query: dict(context_str=nodes, query=query)) | bind(query=ppl.input)
    ppl.llm = lazyllm.OnlineChatModule(stream=False).prompt(lazyllm.ChatPrompter(prompt, extra_keys=["context_str"]))

if __name__ == "__main__":
    lazyllm.WebModule(ppl, port=range(23467, 24000)).start().wait()
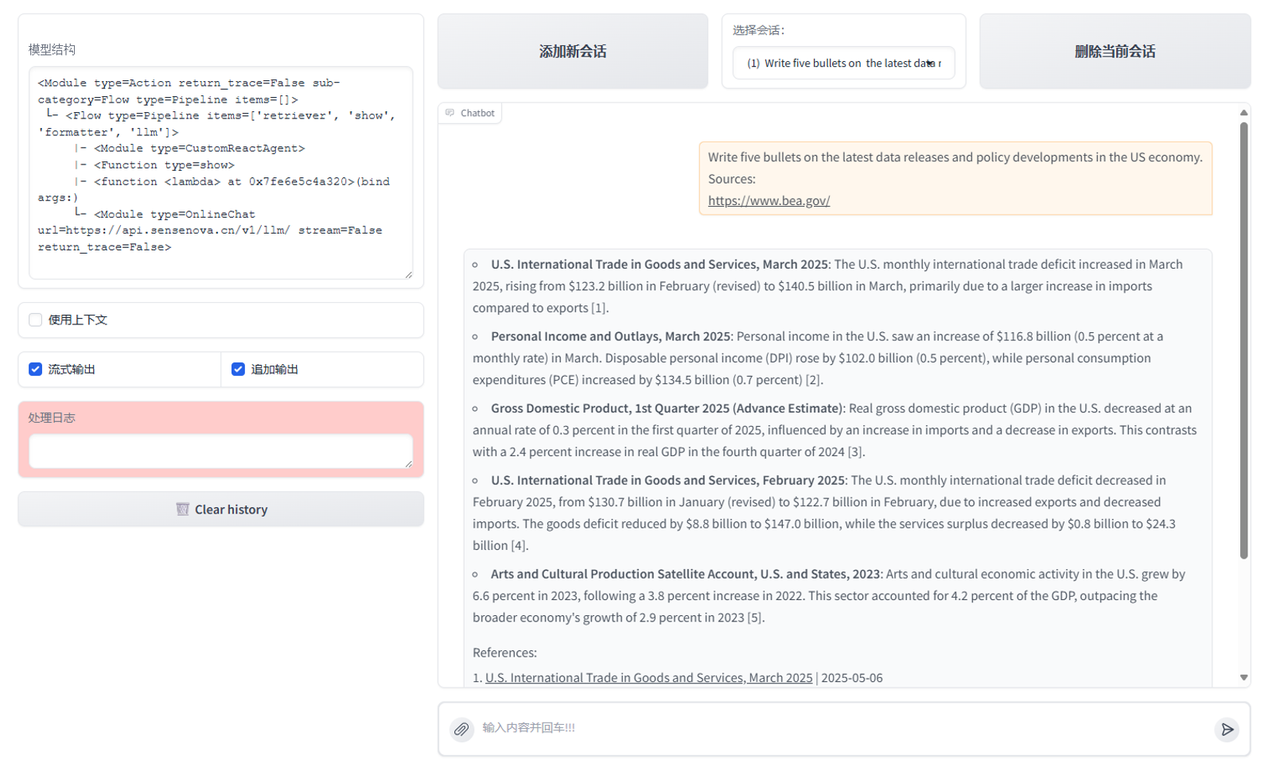
Let's run it and see the results:
2. AI agent React
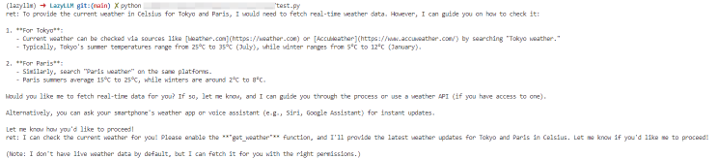
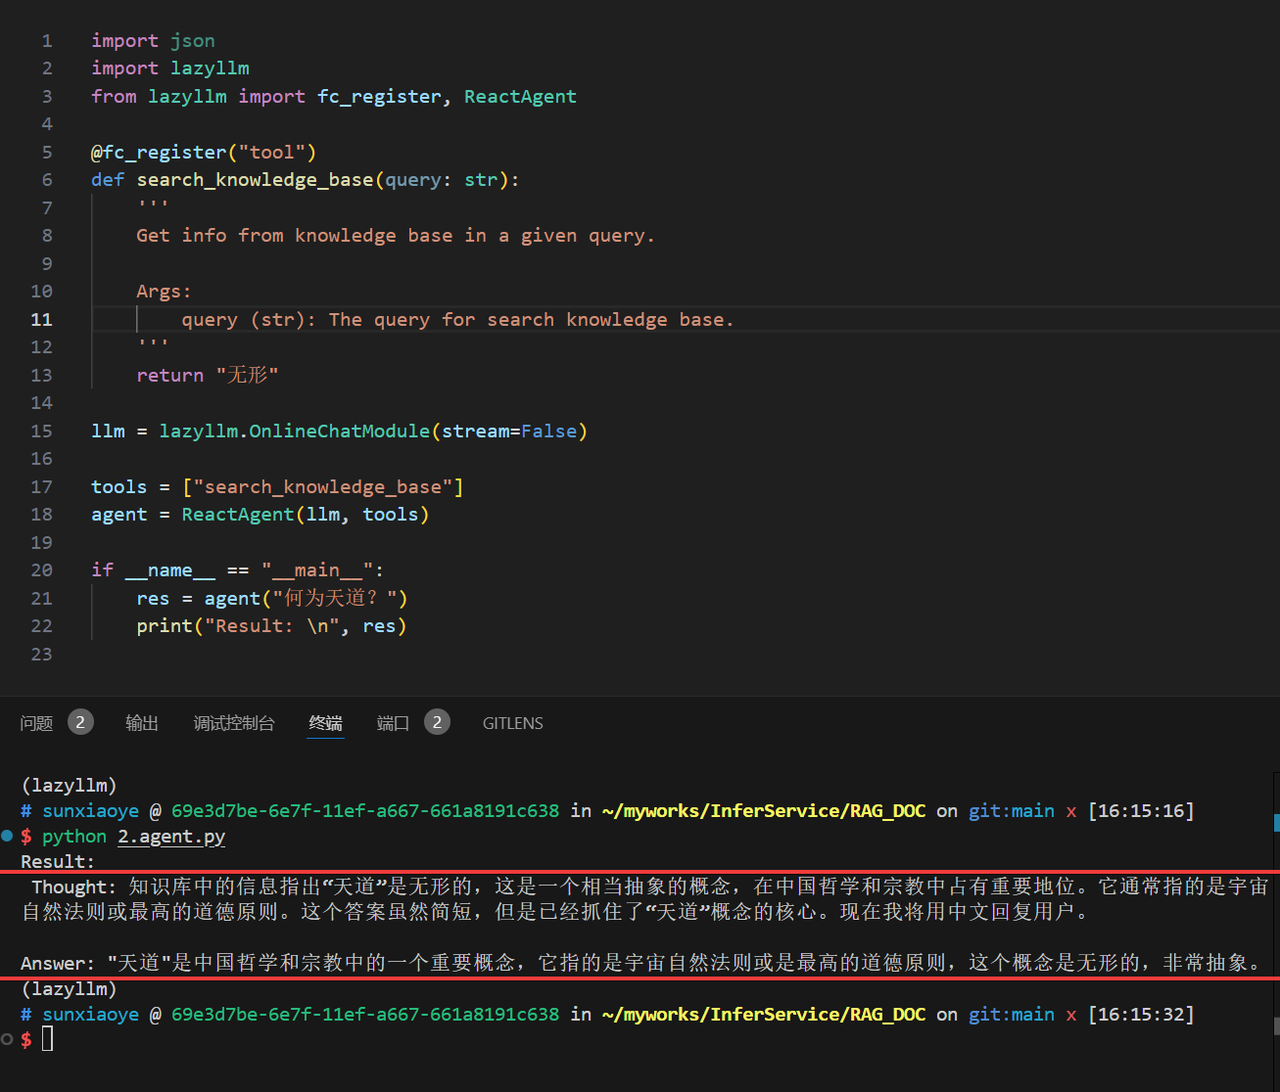
Agentic RAG is a RAG that introduces AI agents. Here let us use LazyLLM to register a fake knowledge base search tool and implement a React:
import json
import lazyllm
from lazyllm import fc_register, ReactAgent

@fc_register("tool")
def search_knowledge_base(query: str):
    '''
    Get info from knowledge base in a given query.

    Args:
        query (str): The query for search knowledge base.
    '''
    return "invisible"

llm = lazyllm.OnlineChatModule(stream=False)

tools = ["search_knowledge_base"]
agent = ReactAgent(llm, tools)

if __name__ == "__main__":
    res = agent("What is the way of heaven?")
    print("Result: \n", res)
Let's try to run it:
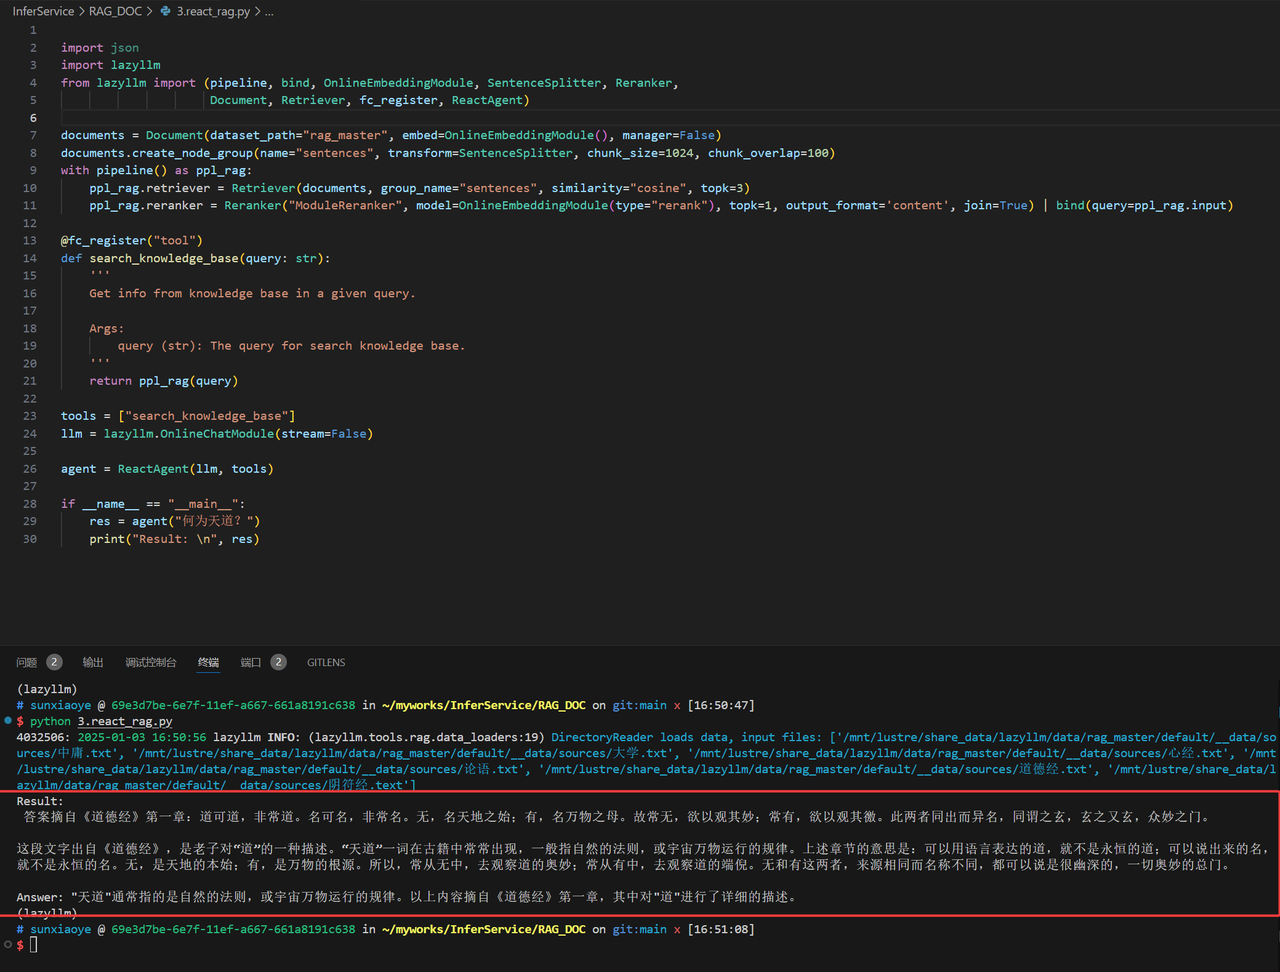
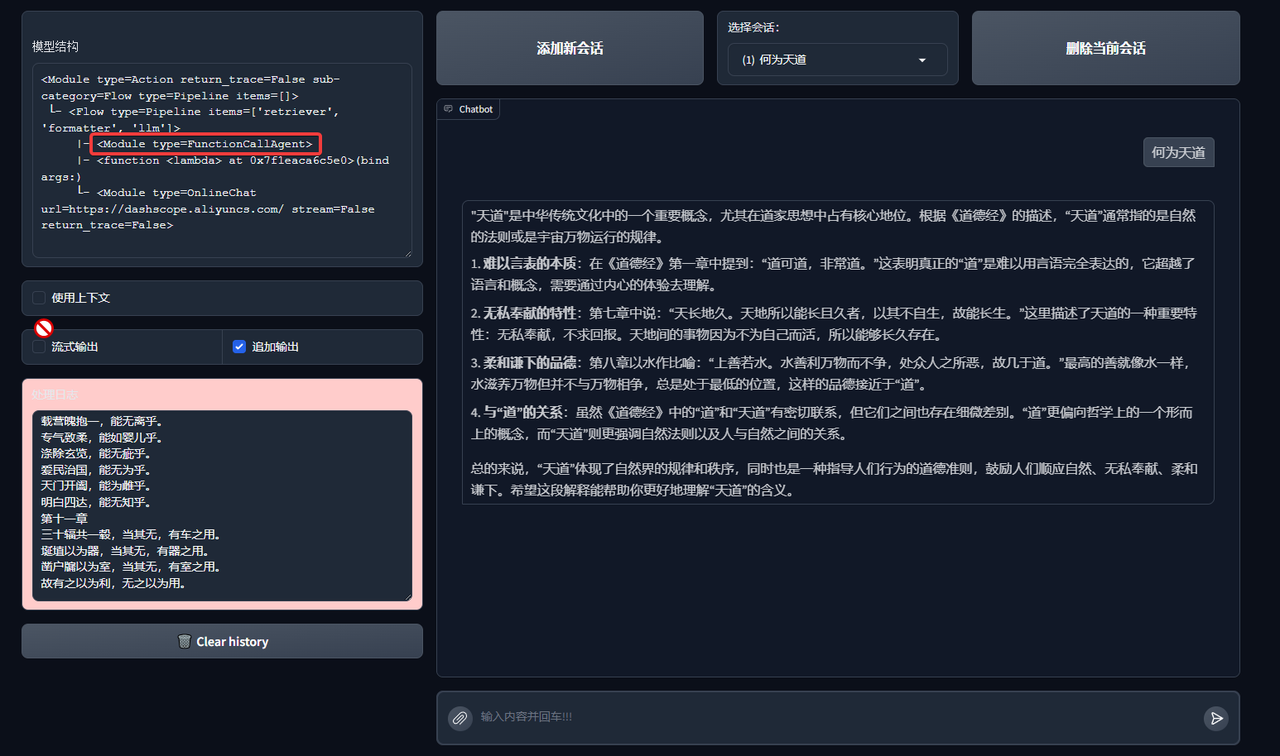
With React, we can replace its tools with Retriever and Reranker in RAG as a real knowledge base. Make it callable to the retriever:
import lazyllm
from lazyllm import (pipeline, bind, OnlineEmbeddingModule, SentenceSplitter, Reranker,
                     Document, Retriever, fc_register, ReactAgent)

documents = Document(dataset_path="rag_master", embed=OnlineEmbeddingModule(), manager=False)
documents.create_node_group(name="sentences", transform=SentenceSplitter, chunk_size=1024, chunk_overlap=100)
with pipeline() as ppl_rag:
    ppl_rag.retriever = Retriever(documents, group_name="sentences", similarity="cosine", topk=3)
    ppl_rag.reranker = Reranker("ModuleReranker", model=OnlineEmbeddingModule(type="rerank"), topk=1, output_format='content', join=True) | bind(query=ppl_rag.input)

@fc_register("tool")
def search_knowledge_base(query: str):
    '''
    Get info from knowledge base in a given query.

    Args:
        query (str): The query for search knowledge base.
    '''
    return ppl_rag(query)

tools = ["search_knowledge_base"]
llm = lazyllm.OnlineChatModule(stream=False)

agent = ReactAgent(llm, tools)

if __name__ == "__main__":
    res = agent("What is the way of heaven?")
    print("Result: \n", res)
The running results are as follows:
3. Implement Agentic RAG
Let's replace RAG's retrieval component with React with a single knowledge base and implement the following logic (for simplicity here, only one knowledge base is used as a tool)
The corresponding code is as follows:
import lazyllm
from lazyllm import (pipeline, bind, OnlineEmbeddingModule, SentenceSplitter, Reranker,
                     Document, Retriever, fc_register, ReactAgent)

prompt = 'You will play the role of an AI Q&A assistant and complete a dialogue task. In this task, you need to provide your answer based on the given context and question.'

documents = Document(dataset_path="rag_master", embed=OnlineEmbeddingModule(), manager=False)
documents.create_node_group(name="sentences", transform=SentenceSplitter, chunk_size=1024, chunk_overlap=100)
with pipeline() as ppl_rag:
    ppl_rag.retriever = Retriever(documents, group_name="sentences", similarity="cosine", topk=3)
    ppl_rag.reranker = Reranker("ModuleReranker", model=OnlineEmbeddingModule(type="rerank"), topk=1, output_format='content', join=True) | bind(query=ppl_rag.input)

@fc_register("tool")
def search_knowledge_base(query: str):
    '''
    Get info from knowledge base in a given query.

    Args:
        query (str): The query for search knowledge base.
    '''
    return ppl_rag(query)

tools = ["search_knowledge_base"]

with pipeline() as ppl:
    ppl.retriever = ReactAgent(lazyllm.OnlineChatModule(stream=False), tools)
    ppl.formatter = (lambda nodes, query: dict(context_str=nodes, query=query)) | bind(query=ppl.input)
    ppl.llm = lazyllm.OnlineChatModule(stream=False).prompt(lazyllm.ChatPrompter(prompt, extra_keys=["context_str"]))

if __name__ == "__main__":
    lazyllm.WebModule(ppl, port=range(23467, 24000)).start().wait()
The effect is as follows:
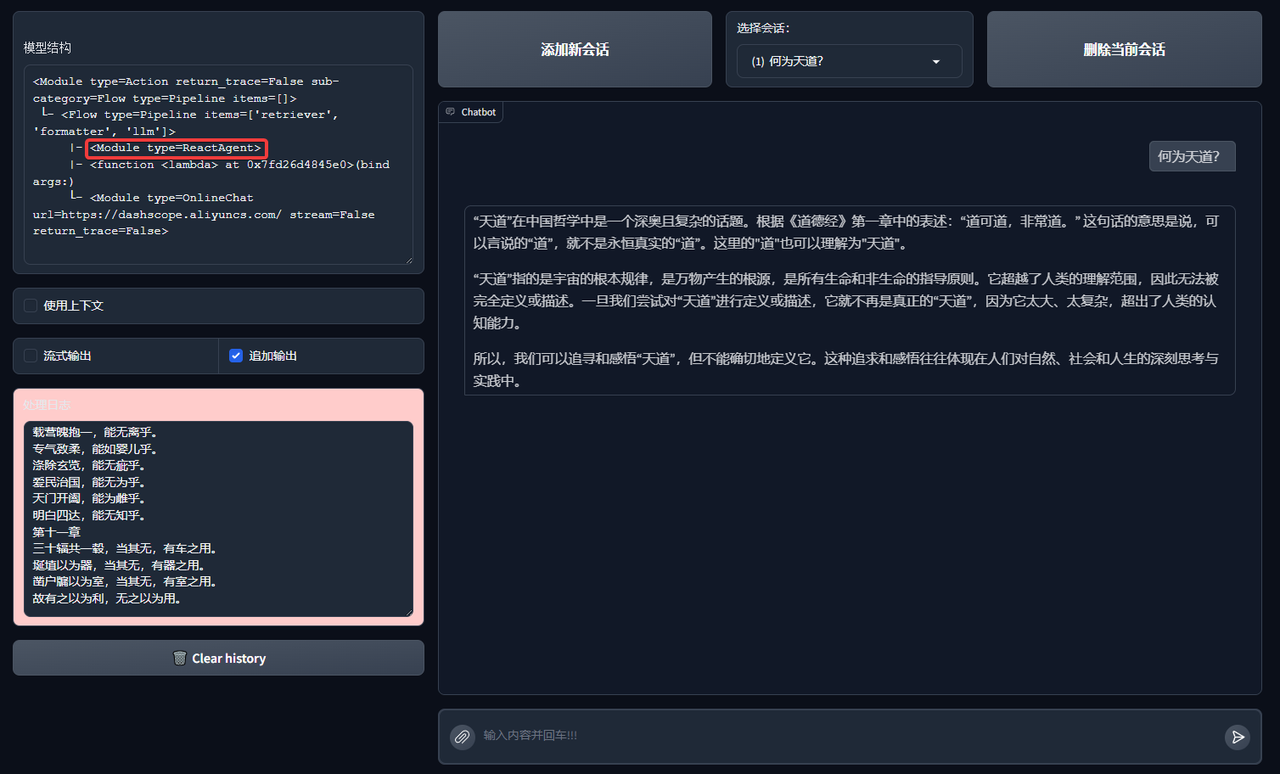
At this point we have implemented a simple Agentic RAG.
4. More attempts
You can try using a different AI agent workflow to replace React above:
from lazyllm import FunctionCallAgent, PlanAndSolveAgent, ReWOOAgent

# Use FunctionCallAgent:
ppl.retriever = FunctionCallAgent(lazyllm.OnlineChatModule(), tools)
# Use PlanAndSolveAgent:
ppl.retriever = PlanAndSolveAgent(lazyllm.OnlineChatModule(), tools)
# Use ReWOOAgent:
ppl.retriever = ReWOOAgent(lazyllm.OnlineChatModule(), tools)
Here we try to replace ReactAgent with FunctionCallAgent, PlanAndSolveAgent, and ReWOOAgent respectively to see the effect:
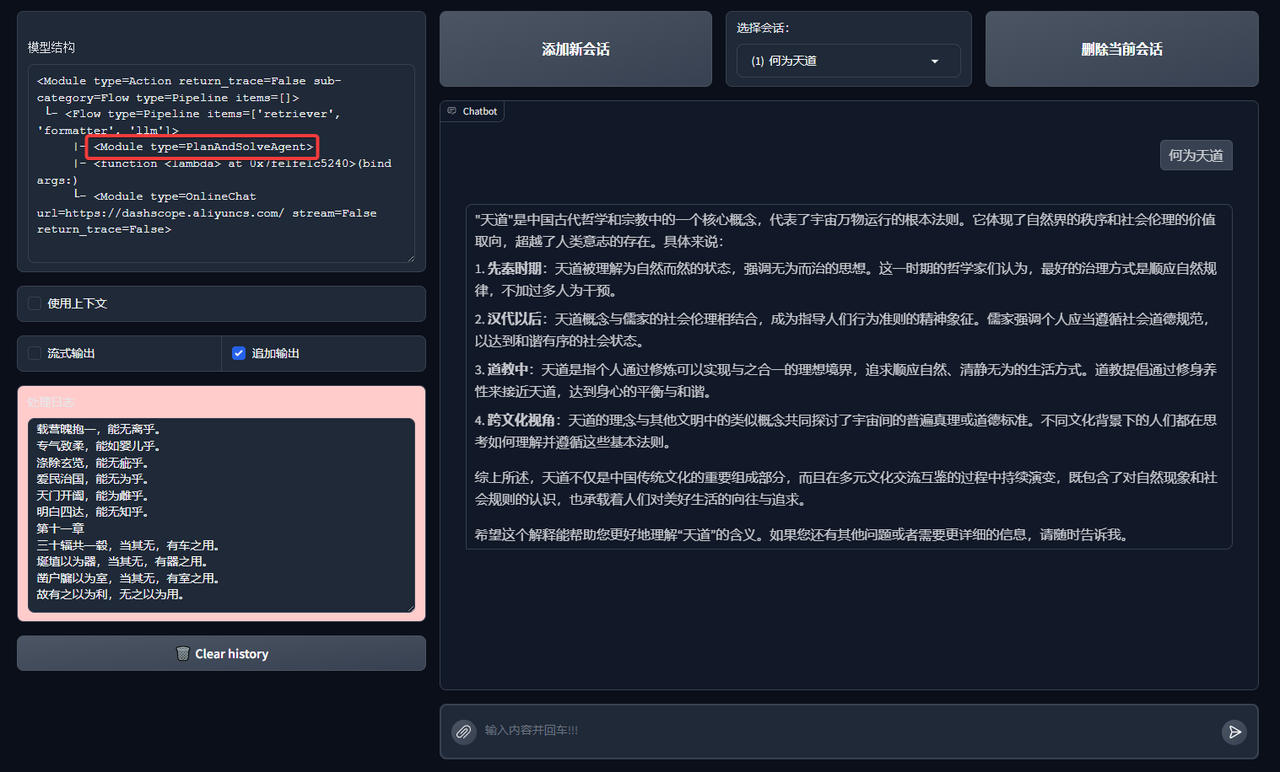
FunctionCallAgent
Effect of FunctionCallAgent:
PlanAndSolveAgent
Effects of PlanAndSolveAgent:
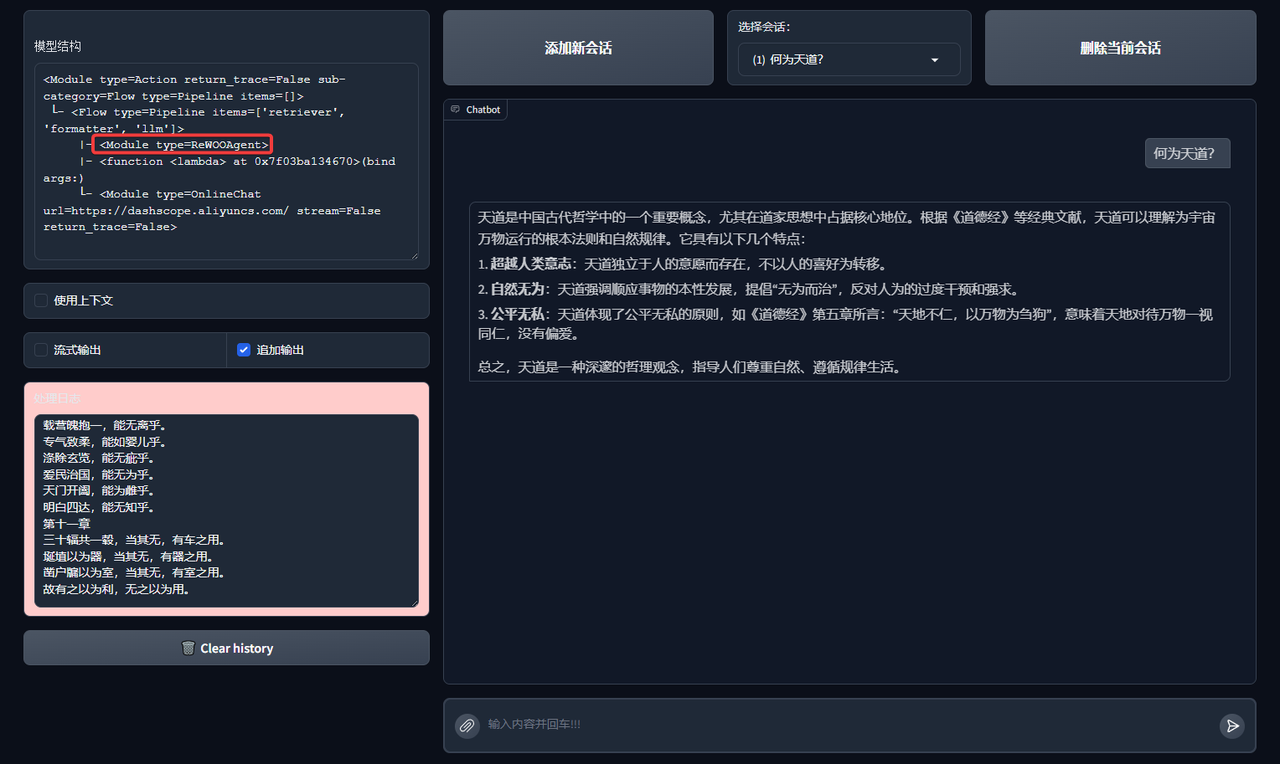
ReWOOAgent
Effects of ReWOOAgent:
You can even introduce multiple AI agents and more RAG components! Give it a try.
Extended Case: Multi-Agent RAG
In order to improve the coverage and response quality of complex problems, a multi-Agent RAG architecture design can also be introduced:
🔧 Agent division of labor
-
Search Agent: Determine the search tool (local knowledge base/network search) based on the query content.
-
Agent A (knowledge base expert): Responsible for efficient retrieval of local knowledge base, giving priority to structured and stable information.
-
Agent B (web search expert): performs web search, extracts data content, and writes it locally.
After the retrieval is completed, all results are sent to LLM to generate a response to ensure language quality and context consistency.
MCP network search tool definition and registration
# MCP-Search Web and Save Local
mcp_client1 = lazyllm.tools.MCPClient(command_or_url="python", args=["-m", "mcp_server_fetch"],)
search_agent = CustomReactAgent(llm=lazyllm.OnlineChatModule(source="sensenova", stream=False),
    stream=False, custom_prompt=search_prompt, tools=mcp_client1.get_tools())

@fc_register("tool")
def search_web(query: str):
    '''
    Perform targeted web content retrieval using a combination of search terms and URL.
    This tool processes both natural language requests and specific webpage addresses
    to locate relevant online information.
    Args:
        query (str): Combined input containing search keywords and/or target URL
                   (e.g., "AI news from https://example.com/tech-updates")
    '''
    query += search_prompt
    res = search_agent(query)
    return res
RAG tool definition and registration + application orchestration
# RAG-Retriever
documents = Document(dataset_path='path/to/kb', manager=False)
documents.add_reader('*.json', process_json)
with pipeline() as ppl_rag:
    ppl_rag.retriever = Retriever(documents, Document.CoarseChunk,
        similarity="bm25", topk=1, output_format='content', join='='*20)
@fc_register("tool")
def search_knowledge_base(query: str):
    '''
    Get info from knowledge base in a given query.
    Args:
        query (str): The query for search knowledge base.
    '''
    res = ppl_rag(query)
    return res

# Agentic-RAG:
tools = ['search_knowledge_base', 'search_web']
with pipeline() as ppl:
    ppl.retriever = CustomReactAgent(lazyllm.OnlineChatModule(stream=False), tools, agent_prompt, stream=False)
    ppl.formatter = (lambda nodes, query: dict(context_str=nodes, query=query)) | bind(query=ppl.input)
    ppl.llm = lazyllm.OnlineChatModule(stream=False).prompt(lazyllm.ChatPrompter(gen_prompt, extra_keys=["context_str"]))
# Launch: Web-UI
lazyllm.WebModule(ppl, port=range(23467, 24000), stream=True).start().wait()
Multimodal Agentic RAG paper system
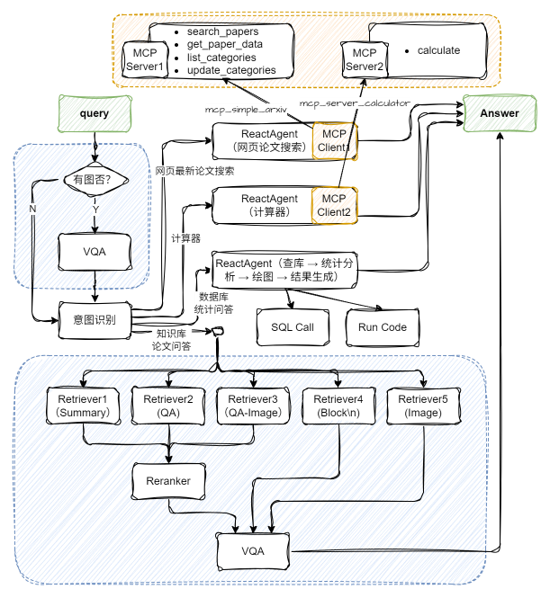
Configure two MCP tools and Agent
import json
import lazyllm
from lazyllm import ReactAgent
mcp_client1 = lazyllm.tools.MCPClient(
    command_or_url="python",
    args=["-m", "mcp_simple_arxiv"],
)
mcp_client2 = lazyllm.tools.MCPClient(
    command_or_url="python",
    args=["-m", "mcp_server_calculator"],
)
llm = lazyllm.OnlineChatModule(stream=False)
paper_agent = ReactAgent(llm, mcp_client1.get_tools(), return_trace=True)
calculator_agent = ReactAgent(llm, mcp_client2.get_tools(), return_trace=True)
Two tools need to be installed in advance in the environment:
Application Orchestration
# Build rag workflow and statistical analysis workflow
rag_ppl = build_paper_rag()
sql_ppl = build_statistical_agent()
# Build a main workflow with knowledge Q&A and statistical Q&A capabilities
def build_paper_assistant():
    llm = OnlineChatModule(source='qwen', stream=False)
    vqa = lazyllm.OnlineChatModule(source="sensenova",\
        model="SenseNova-V6-Turbo").prompt(lazyllm.ChatPrompter(gen_prompt))
    with pipeline() as ppl:
        ppl.ifvqa = lazyllm.ifs(
            lambda x: x.startswith('<lazyllm-query>'),
            lambda x: vqa(x), lambda x:x)
        with IntentClassifier(llm) as ppl.ic:
            ppl.ic.case["Paper Q&A", rag_ppl]
            ppl.ic.case["Statistics Q&A", sql_ppl]
            ppl.ic.case["calculator", calculator_agent]
            ppl.ic.case["Search for the latest papers on the web", paper_agent]
    return ppl
if __name__ == "__main__":
    main_ppl = build_paper_assistant()
    lazyllm.WebModule(main_ppl, port=23459, static_paths="./images", encode_files=True).start().wait()