Chapter 2: Build a Minimal RAG System in 10 Minutes
In chapter 1 we introduced large-model and RAG theories. Now it's time to put that theory into practice and use LazyLLM to build the most basic RAG pipeline.
This tutorial walks you through the steps required to assemble a minimal RAG system with LazyLLM. We'll start with the environment setup, revisit the RAG workflow, explain the document loader, retriever, and generator components, and finally wire them together to observe the output.
Here we go!🏃🏃🏃
Environment Preparation
Before building a RAG system with LazyLLM, finish both “Development Environment Setup” and “Environment Variable Configuration.”
1. Development Environment Setup
You can pick any of the following approaches to prepare the LazyLLM dev environment.
Manual configuration✏️
LazyLLM is implemented in Python, so make sure Python, Pip, and Git are available. Installing them on macOS takes a few extra steps—see the appendix for detailed instructions.
Create a virtual environment named lazyllm-venv and activate it:
If everything works you should see (lazyllm-venv) at the beginning of your prompt. Keep all subsequent commands inside this virtual environment.
Download the LazyLLM code from GitHub:
Then switch into the cloned repository:
Install the base dependencies:
Add LazyLLM to Python's module search path:
Now you can import it from any directory.
Pull the image📑
We also publish a Docker image with the latest LazyLLM release so you can get started immediately:
You can also browse https://hub.docker.com/r/lazyllm/lazyllm/tags and pull the tag you need.
Install the minimal dependency bundle that unlocks every LazyLLM feature. It supports fine-tuning and inference for hosted models as well as offline fine-tuning (powered by LLaMA-Factory) and offline inference (vLLM for LLMs, LMDeploy for multimodal models, and Infinity for embedding models).
Install the full dependency bundle to enable advanced features such as automatic framework selection (AutoFinetune, AutoDeploy, etc.), more offline inference engines (e.g., LightLLM), and additional offline training pipelines (e.g., AlpacaloraFinetune, CollieFinetune, etc.).
2. Configure API keys
Calling LLMs can happen online or locally. For online calls you must supply the provider's API key. Register an account with that platform if you do not already have one. LazyLLM automatically reads platform API keys from environment variables: set the key once, then simply specify the platform and model name when you invoke the module.
LazyLLM currently supports the following providers:
| Platform | How to get the API key | Environment variables |
|---|---|---|
| SenseNova | Get access keys (ak and sk) (Method 1), Get access key (API key only) (Method 2) | LAZYLLM_SENSENOVA_API_KEY, LAZYLLM_SENSENOVA_SECRET_KEY (Method 1) / LAZYLLM_SENSENOVA_API_KEY (Method 2) |
| OpenAI | Create an API key | LAZYLLM_OPENAI_API_KEY |
| Zhipu | Create an API key | LAZYLLM_GLM_API_KEY |
| Kimi | Create an API key | LAZYLLM_KIMI_API_KEY |
| Tongyi Qianwen | Create an API key | LAZYLLM_QWEN_API_KEY |
| Doubao | Create an API key | LAZYLLM_DOUBAO_API_KEY |
| DeepSeek | Create an API key | LAZYLLM_DEEPSEEK_API_KEY |
To expose your API key as an environment variable:
- Obtain the API key for your target platform (SenseNova requires two keys for Method 1).
- Run the following command to set the environment variables:
For example, if you use SenseNova and obtained the key through Method 1, set the variables below:
export LAZYLLM_SENSENOVA_API_KEY="Your Access Key ID"
export LAZYLLM_SENSENOVA_SECRET_KEY="Your Access Key Secret"
If you used Method 2, set only this variable:
Once the environment variables are in place, instantiate OnelineChatModule, specify the model source, and LazyLLM will read the corresponding API key automatically.
This makes it easy to manage API keys for multiple providers and keeps the online invocation flow simple.
RAG in Practice
1. Review of the Core Principles ✈️
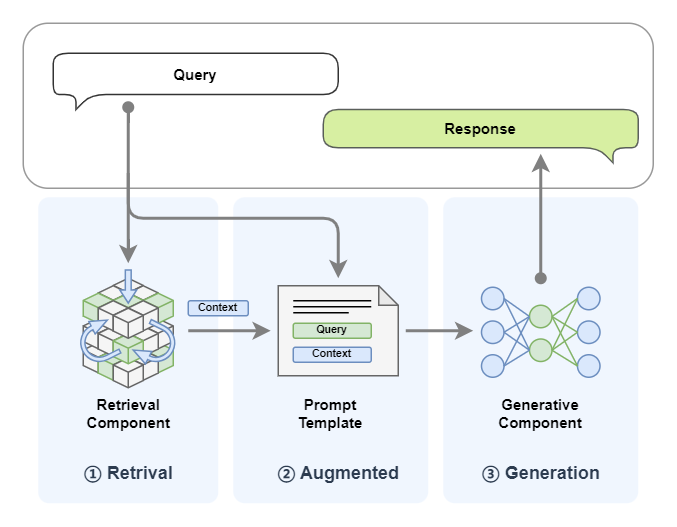
After the LazyLLM environment is configured, let's recap the basics of RAG (Retrieval-Augmented Generation). When the model needs to produce an answer, it first retrieves relevant information from a large collection of documents. The retrieved facts are fed into the generation step so the final response is grounded and accurate. The following diagram shows the workflow: the system receives a user query, the retriever fetches similar content from external documents, the query plus retrieved context are sent to the LLM, and the LLM returns the answer.
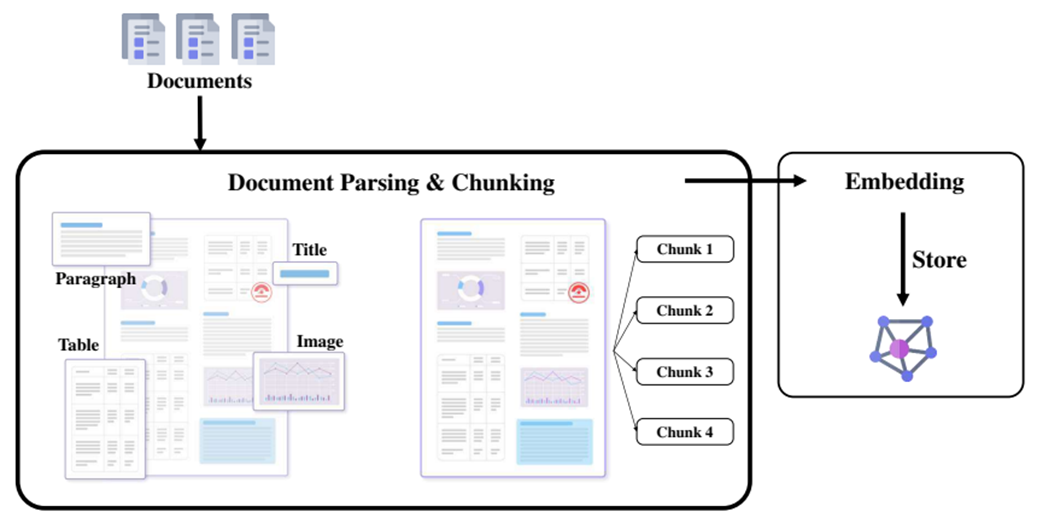
The offline workflow boils down to three steps:
- Document ingestion and parsing (Reader)
Load documents of various formats into the system. You can use open-source tools such as MinerU to improve parsing accuracy.
- Chunking and vectorization (Transform and Vectorize)
Clean, deduplicate, and split the raw data, then convert it into embeddings.
- Indexing and storage (Indexing and Store)
Store and index the processed text in a vector database or another high-performance retrieval backend.
Summary
The end-to-end RAG pipeline can be summarized in three phases:
1. Retrieval
Given a user query, look up related information in the knowledge base.
2. Augmentation
Attach the retrieved text as extra context and send it to the LLM together with the user query.
3. Generation
The LLM combines the retrieved knowledge with its own pretraining to produce the final answer.
We'll now dig into LazyLLM's document management, retriever, and generator components in that order.
Here we go!🏄
2. Document management 📚
The core of RAG is document retrieval from a document collection. This collection may include many different formats: rich-text files such as DOCX, PDF, and PPT; plain-text formats such as Markdown; or content retrieved from an API, such as results returned by a search engine. Because these documents come in diverse formats, we need specialized parsers to extract useful information such as text, images, tables, audio, or video.
In LazyLLM, these parsers are abstracted through the Document class. The built-in Document component can extract content from common rich-text formats including DOCX, PDF, PPT, and Excel. You can also implement a custom Reader to handle additional formats, which we will cover in later tutorials.
The main parameters of Document are as follows:
Parameters:
dataset_path(str) – Path to the dataset directory. The directory must contain the documents to be managed by the module (single-file inputs are not supported yet).embed(Optional[Union[Callable, Dict[str, Callable]]], default:None) – Embedding generator. Provide a dict if you want to create multiple embeddings per document; the dict keys are embedding names and the values are the embedding callables.manager(bool, default:False) – Whether to spin up a UI for the document module. Defaults toFalse.launcher(optional, default:None) – Object or function that starts the server module. If omitted, LazyLLM uses the default async launcher inlazyllm.launchers(sync=False).store_conf(optional, default:None) – Configures the storage backend and index backend.doc_fields(optional, default:None) – Describes which fields should be stored and retrieved plus their types (currently used only by the Milvus backend).
We'll focus on the simplest usage here. Advanced parameters such as embed and manager will be covered later. For now you only need to provide the dataset directory path:
# RAG document loading
from lazyllm import Document

# Using an absolute path
doc = Document("path/to/content/docs/")
print(f"Actual path passed in: {}")

# Using a relative path
doc = Document("/content/docs/")
Make sure you pass an absolute path or a path relative to the current directory. Otherwise set the LAZYLLM_DATA_PATH environment variable to your document root and then provide a relative path, as shown below:
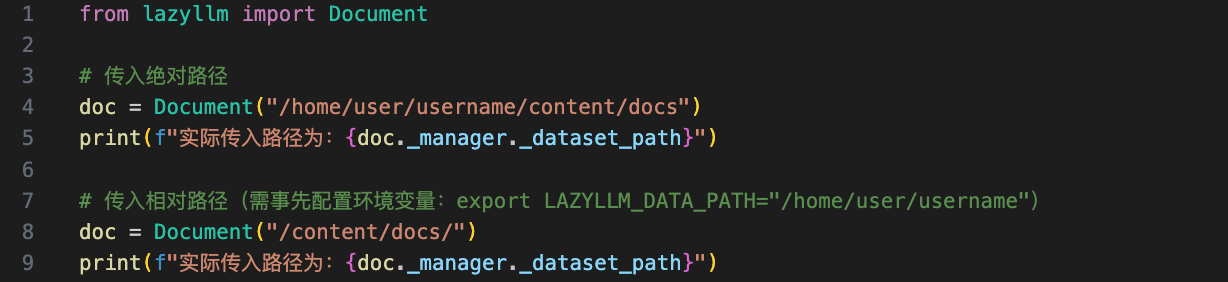

In the snippet above we inspect doc._manager._dataset_path to confirm the path that was ultimately passed into the document loader—both approaches produce identical results.
3. Retriever component 🕵
The documents in your corpus rarely align perfectly with every query, so you need a retriever to filter the relevant context. LazyLLM provides the Retriever component, which creates a retrieval module that can search across one or more Document instances using the similarity metric you specify. Key parameters include:
Parameters:
doc(object) – The document module instance (or list of instances) to search.group_name(str) – The node group to query.
group_name has three built-in chunking strategies, all powered by SentenceSplitter but with different chunk sizes:
◦ CoarseChunk: chunk size 1024 with 100-token overlap
◦ MediumChunk: chunk size 256 with 25-token overlap
◦ FineChunk: chunk size 128 with 12-token overlap
similarity(Optional[str], default:None) – Similarity metric used during retrieval. Defaults to"dummy". Options:"bm25","bm25_chinese","cosine".similarity_cut_off(Union[float, Dict[str, float]], default:float('-inf')) – Drop nodes whose similarity falls below this threshold. Provide a dict to set individual thresholds for each embedding.index(str, default:'default') – Index type used for retrieval. Currently only'default'is supported.topk(int, default:6) – Number of nodes to return.embed_keys(Optional[List[str]], default:None) – Embedding keys to use when retrieving. If omitted, all embeddings are considered.
The following line configures a retriever that works on the doc corpus, searches the Coarse chunk node group with bm25_chinese, and returns the top 3 most similar nodes. We'll focus on how to call the retriever here; algorithms and tuning tips will be covered later (see Practice 2).
from lazyllm import Retriever

# Load documents using an absolute path
doc = Document("/path/to/content/docs/")

# Create a Retriever. Here we use the built-in chunking strategy "CoarseChunk"
# and the BM25-based similarity function for Chinese text.
retriever = Retriever(doc, group_name=Document.CoarseChunk, similarity="bm25_chinese", topk=3)

# Run the retriever with a query
retriever_result = retriever("your query")

# Print the content of the first retrieved chunk
print(retriever_result[0].get_content())
Let's run the code and inspect the output:
retriever_result is a list in which each element represents a node (we'll explain nodes in Advanced 1). Call get_content() on a node to print its text.
4. Generator component 🙋
Once we have the retrieved context and the user query, we feed both into the generator—the LLM—to produce the final answer. We'll use an online model as an example and show how LazyLLM calls it.
OnlineChatModule unifies access to hosted LLMs. Regardless of whether you're targeting the OpenAI, SenseNova, or any other API, LazyLLM wraps the parameters for you: simply specify the provider via source and the model name via model.
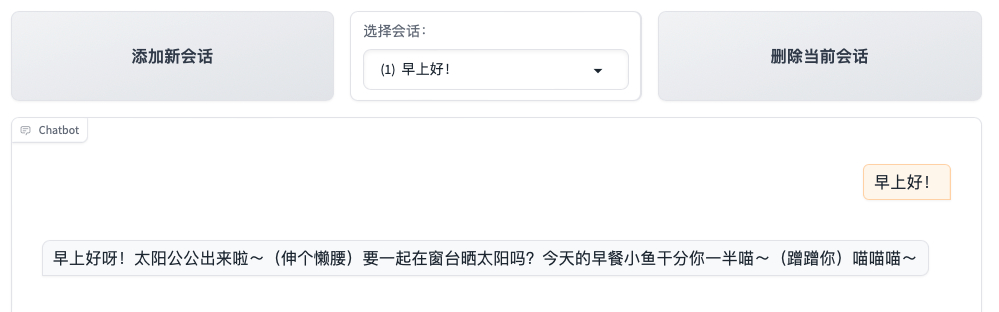
llm_prompt = "You are a small cat. After every response, you must add '喵喵喵'."
llm = lazyllm.OnlineChatModule(source="sensenova", model="SenseChat-5-1202").prompt(llm_prompt)

print(llm("早上好!"))
# >>> Good morning! The sun is up~ (stretching) Want to sit by the window and enjoy the sunlight together?
# >>> I'll share half of my dried fish with you~ (nuzzles) 喵喵喵~
Those three lines are all you need to call an LLM. First define a prompt so the model knows how to respond—every subsequent reply will follow that instruction.
Next, configure the model by instantiating OnlineChatModule, passing the provider via source and the model name, and registering the prompt through .prompt.
Finally, invoke the configured model by sending your question to llm just like any regular chat interface.
You can also replace line 4 above with the following snippet to spawn a simple chat UI:
Here we start a lightweight web client with lazyllm.WebModule. Paste the host and port into your browser to interact with the chat interface.
Build the RAG Knowledge Base
With the foundational components in place, we can now assemble a complete RAG workflow. Before that, we need a corpus. We'll construct a knowledge base from the original cmrc2018 dataset and reuse it throughout the remaining chapters whenever we discuss improvements or optimizations.
1. Dataset overview
CMRC 2018 (Chinese Machine Reading Comprehension 2018) [1] is a Chinese span-extraction reading comprehension dataset. Human annotators created nearly 20,000 real questions based on Wikipedia passages to increase linguistic diversity in Chinese MRC tasks.
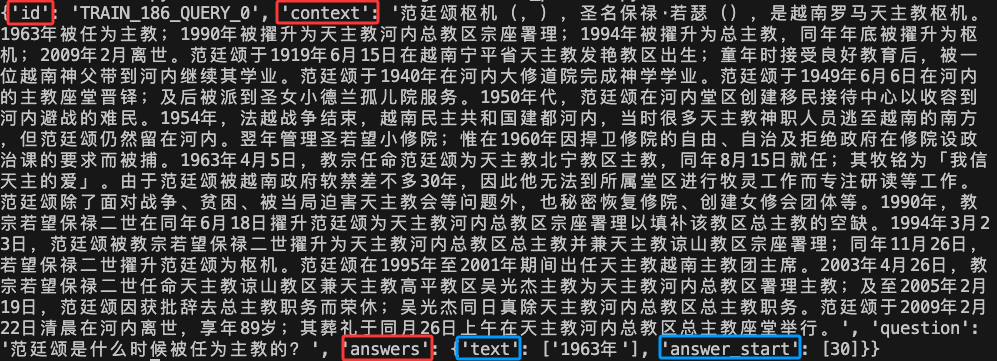
Each record contains four fields: id, context, question, and answers. id is the identifier, context is a descriptive passage (history, news, fiction, etc.), and answers lists the human-written spans. answer_start marks the token offset inside context, and text stores the actual answer. In the example below two experts annotated the same question independently to ensure accuracy.
Download the dataset locally with the datasets library (install it first via pip install datasets if needed):
from datasets import load_dataset
# Load the dataset
dataset = load_dataset('cmrc2018')
# Alternatively, specify a custom download path:
# dataset = load_dataset('cmrc2018', cache_dir='path/to/datasets')
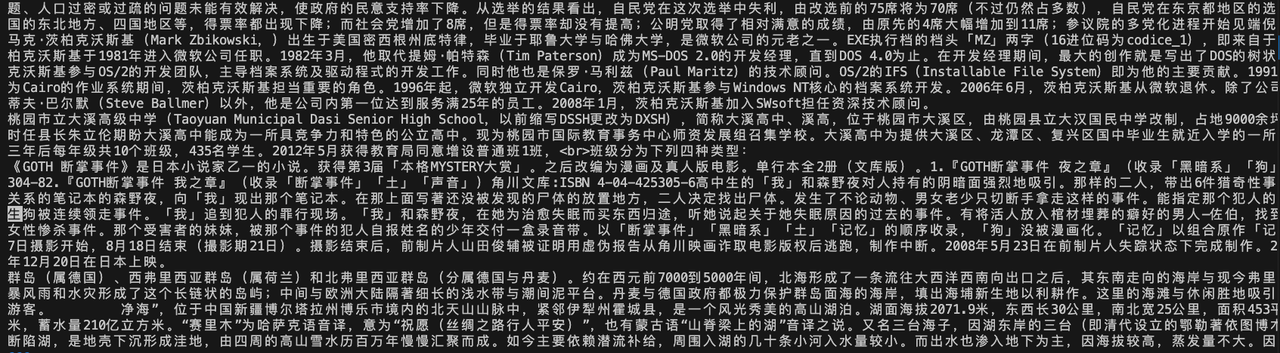
print(dataset)
The dataset is downloaded to .cache/huggingface/datasets by default. Pass cache_dir if you prefer a custom path. After the download completes you'll see train, validation, and test splits, as shown below:
2. Build the knowledge base
We'll use only the test split for the RAG corpus; the other splits will be used later when we fine-tune models (we'll explain why in those chapters). Each sample contains id, context, question, and answers. We'll feed the context values into the knowledge base so we can evaluate the RAG system by querying with the paired question and comparing the generated answer with the original answers. Sound confusing? Don't worry—future chapters will break it down. For now just remember that the knowledge base is built from the context field of the test split. The code is shown below:
def create_KB(dataset):
    """Create a knowledge base from the 'context' field in the test set.
    Every 10 entries are saved into one .txt file. The remaining entries
    (if fewer than 10) are saved into a final file.
    """
    Context = []
    for i in dataset:
        Context.append(i['context'])
    Context = list(set(Context))  # Deduplicate and obtain 256 unique items

    # Compute the number of files needed
    chunk_size = 10
    total_files = (len(Context) + chunk_size - 1) // chunk_size  # Ceiling division

    # Create the folder 'data_kb' to store the text files
    os.makedirs("data_kb", exist_ok=True)

    # Write every group of 10 entries into separate files
    for i in range(total_files):
        chunk = Context[i * chunk_size : (i + 1) * chunk_size]
        file_name = f"./data_kb/part_{i+1}.txt"
        with open(file_name, "w", encoding="utf-8") as f:
            f.write("\n".join(chunk))  # Write separated by newline

        # print(f"File {file_name} written successfully.")
Explanation:
- Lines 2–3 iterate over
data, grab each entry'scontext, and append it to theContextlist. By the endContextholds every passage. - Line 6 deduplicates the contexts by wrapping the list in
set()and then converting it back to a list. - Lines 9–10 set
chunk_size = 10, meaning each text file stores up to 10 contexts.total_filesuses ceiling division(len(Context) + chunk_size - 1) // chunk_sizeso the remainder still gets written to a file. - Lines 15–20 split the contexts into groups of 10 and write each group to a standalone
.txtfile: for i in range(total_files): iterate over the number of files we need.chunk = Context[i * chunk_size : (i + 1) * chunk_size]: grab the current batch of 10 contexts.file_name = f"./data_kb/part_{i+1}.txt": generate unique file names such aspart_1.txt,part_2.txt, etc.with open(file_name, "w", encoding="utf-8") as f:: open each file for writing with UTF-8 encoding.f.write(" ".join(chunk)): join the contexts with newlines and flush them to disk.
# Create the knowledge base using create_KB()
create_KB(dataset['test'])
# Display the contents of one of the generated text files
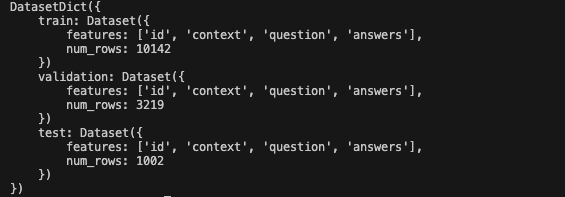
with open('data_kb/part_1.txt') as f:
print(f.read())
After the script finishes you'll see a data_kb folder in the current directory containing multiple .txt files:

The files look like this:
Keep track of the
data_kbpath. Unless otherwise noted, all upcoming RAG examples will use this directory as the knowledge base.
3. Environment check
Verify whether the SQLite library on your machine supports multithreading:
If the result is False, reinstall SQLite with multithreading support. On macOS you can run:
If the output path is not the Homebrew-installed SQLite, export the variables below and reinstall Python:
brew uninstall python
export PATH="/opt/homebrew/opt/sqlite/bin:$PATH"
export LDFLAGS="-L/opt/homebrew/opt/sqlite/lib"
export CPPFLAGS="-I/opt/homebrew/opt/sqlite/include”
brew install python
Build the basic RAG
Now that we understand the three core components and prepared the knowledge base, let's implement the simplest RAG pipeline.
Remember the three building blocks:
- Document – Loads and manages the corpus; just point it to your documents.
- Retriever – Searches the document store. Configure which corpus to search, the strategy, and the number of hits to return.
- LLM – Generates the final answer from the query plus retrieved documents. LazyLLM offers
TrainableModulefor local models andOnlineChatModulefor hosted models so you can switch between them without changing code.
Chaining these components together yields the simplest RAG system:
import lazyllm

# Load documents
documents = lazyllm.Document(dataset_path="/content/docs")

# Define the retriever
retriever = lazyllm.Retriever(
    doc=documents,
    group_name="CoarseChunk",
    similarity="bm25_chinese",
    topk=3
)

# Define the generation module
llm = lazyllm.OnlineChatModule(source="sensenova", model="SenseChat-5")

# Prompt design
prompt = (
    "You will act as an AI question-answering assistant and complete a dialogue task. "
    "In this task, you should provide your answers based on the given context and question."
)
llm.prompt(lazyllm.ChatPrompter(instruction=prompt, extra_keys=['context_str']))

# Inference
query = "Introduce Yushan arrow bamboo for me."

# Retrieve document nodes
doc_node_list = retriever(query=query)

# Build input for the model by combining query and retrieved content
res = llm({
    "query": query,
    "context_str": "".join([node.get_content() for node in doc_node_list])
})

print(f'With RAG Answer: {res}')
Here's how that code works:
- Lines 4, 7, and 10 instantiate the document loader (
document), retriever (retriever), and generator (llm) respectively. - Line 13 defines the LLM prompt via
llm.prompt. The built-inChatPrompterformats the RAG instructions so the model knows which parts are references and which part is the user query. It also converts the content into the wire format expected by online APIs. - Line 17 captures the user query, line 19 calls the retriever, and the results are stored in the list
doc_mode_list. - Line 21 calls the LLM with a dict containing the question (
query) and the concatenated retrieval context (content_str), which we build by calling.get_content()on each node and joining the strings.
For comparison, here's what happens when you call the LLM without any RAG context:
# Define the generation module (without RAG)
llm_without_rag = lazyllm.OnlineChatModule(source="sensenova", model="SenseChat-5")

# Query
query = "Introduce Yushan arrow bamboo for me."

# Run the model directly without retrieval
res = llm_without_rag(query)

print(f'Without RAG Answer: {res}')
Let's review the runtime output:
References:
[1] A Span-Extraction Dataset for Chinese Machine Reading Comprehension
Appendix: Install Python, Pip, and Git on macOS
- Install Xcode first.
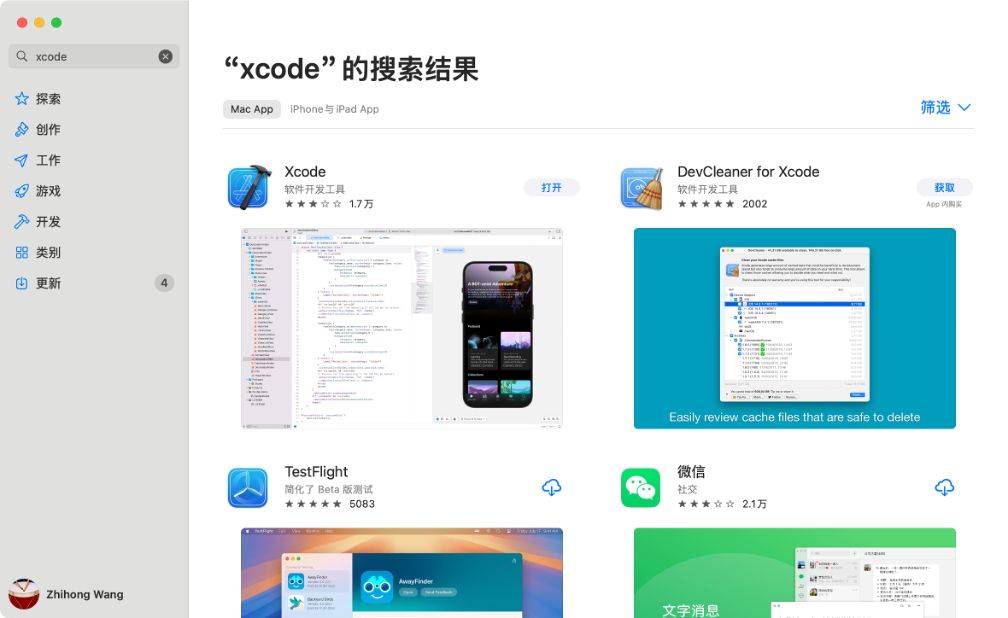
Accept the license agreement and install the Xcode command-line tools:
sudo xcode-select -s /Applications/Xcode.app/Contents/Developer  # Ensure the path is correct
sudo xcodebuild -license accept                                  # Accept the license agreement
xcode-select --install                                           # Install Xcode Command Line Tools
- Install Homebrew, then use it to install Python and pip:
/bin/bash -c "$(curl -fsSL https://raw.githubusercontent.com/Homebrew/install/HEAD/install.sh)"
echo 'eval "$(/opt/homebrew/bin/brew shellenv)"' >> ~/.zshrc
source ~/.zshrc
brew install pyenv
pyenv install 3.10.0
- Install Python 3.10. Do not install Python 3.13 because the
spacydependency does not support it yet.